Hi everyone! Well, long time no see
...'bout that in a while...
first let me say sorry because of this
video is being recorded by myself
like a selfie video, quality won't be
that much... Not that the other videos were [good]
this one will be even worse! Anyway about
content, last video i did was just
right after the MakerFaire and I had
a lot of ideas to do, to try out
for example the CoreXY which I'm trying
show you right now, you can see it with
front motors instead of the old rear
motors and just two belts of same size...
...not same tension, that the problem I've been
arguing with for the last three months
yes, it seemed a lot easier than the old
movement system i was using, the one you
can see in the photo, which has two parallel
Y belts running along the chassis
and one X belt like an H-Bot with the motor that
was sitting right there in the back
unfortunately I couldn't manage to make
this this one [to] work. The CoreXY is
a very very nice moving system
but unfortunately it takes two things to work
...to work at all!
Just remember that we are trying to move something
in a very very precise mode and
we don't want nothing to go wrong for
example the circles, we want them to
be perfect circles, the squares we
want them to be of an equal
length on both axes
well, this totally doesn't do anything
of that. When I started it with part CoreXY
(lol I pronunced Y as "epsilon", the way it's spelled in italian)
and part old moving system,
that's because when I've started I had only this one printer
one so i started printing and replacing
piece by piece every part of it and
initially it worked, I had perfectly
round circles,
I had very nice prints but some issues with
some diagonal lines on some circles, and that
started puzzling me and the more I go
forth on the CoreXY system and
the worse the problem got,
so for now i have a full CoreXY
system and it is TOTAL CRAP. Totally. Now, a friend of mine
who also brought here some of his printers
for example is TAZ 5 and his i3
rework which now me and my friends are
currently using to make new printers
we've assembled this one which is like
a "small NazzaBot" - I mean, nothing
exceptional new things,
it is the same design I did for the carriage, for the extruder
shuttle, but we added as you can see
also here the CoreXY.
Here we have perfect circles, no wobbling at all,
we were just trying it with a one
millimeter nozzle, wich is quite huge you know,
with this little Predator thing but
without any infill because we had just
few meters of filament and we were just
trying it out; now, we sprayed some paint
over it and as you can see yes, there are some extrusion problems
and also i won't say it is
wobbling, it is something else but
maybe it is because this printer is much more of a
prototype than my NazzaBot, and the carriages are
not so stiff, it has broken as you can see
it's difficult to show, I need my cameraman back!
Marco please come back! - he found a job
so actually he's unavailable.
So, the printers.. yes we are currently trying to
fix this one because we still want to find
a way to have a large printer - this is one still have
half a meter per axis of
movement and no wobbling at all, i can
assure you, as this one now because also the NazzaBot
has no more wobbling like this one [print] had
but this was a print I did like two and half year ago
when there was still - I think - two
leadscrews driving the Z axis, not four
as is now
And yes, a lot of things have changed in
the last three months so not only the CoreXY
not only all the printers
not only this friend of us that
came with us playing with the printers, we
also did a lot of modifications to the NazzabBot, not only the CoreXY but also the print bed, now as you
can see there are five beams running along
under it, under the printe bed and also
very very large... How to call them? I don't know, anyway
this piece as you can see runs along this column
like when using a smooth rod.
I've seen that it is not necessary to use a smooth
rod in this case because
the less the parts, the better the project - and so I've been
working a lot with my friends also and
we came up with these pieces and... they work!
I am unfortunately still waiting new
materials to come and try new pieces
trying new carriages... well, I told you
that there has been a lot of things moving on,
and new things to try out,
for example: remember this one?
this has been a Y carriage,
should have been there if I do remember correctly, it was the first one with skateboard
wheels, and I will never thank Bruno M. enough
for this suggestion because
it really made the printer totally silent.
So, then, we started moving on the
CoreXY, for example those carriages,
they had four... no, five wheels, three on
the horizontal part, two on the vertical part
and of course our old bearing friends
skateboard bearings and guess what... perfect
carriage, totally not stiff system. So it
didn't work out.
We even tryied, should you be interested in,
"no-wheel carriages". Yes. Actually they did
work for a time because PLA totally skates
... I know, it sounds like I love skateboards but this has no wheels
it is just that it is "skating" over the beam,
no friction all, totally. Well, I'm not the
first one trying this, I made some
research and there are some people which use the same
thing with the extruded aluminum
profiles and printed skates
like that line on little Prusas and
they work, so I decided to give
it a try and well, it worked but
you still have, on a CoreXY system, to totally
make the carriage perfectly bound to the
thing you choose to make it run on,
for example I have these extrusion profiles
and I had to make it work by totally
binding it to event that caused a lot
of friction; as long as you just have to
make it slide over it
there's no problem, PLA works great, but not for this one,
maybe it would have worked for that, for
the "shuttle", the green part you see there
but was a total failure here, so we
tried a lot of other designs, for example
this one which was promising, we had
the old bearings system - it's quite heavy, and
well, unfortunately the main difference
between... let's see... where the
old carriage... oh there it is! ok so this one
is the one that we moved on
double extruder, another thing that I
chose to remove and I'll tell you why in a short while,
and double fan; they were no standard fans,
they were... lemme show you...
ok those things over there, you maybe
have seen them on the facebook page of
the printer, they are server fans
that I took off old server
power supplies like this scene
that thing, that small thing moves a lot of air, so
much that we successfully printed 60 cm bridges over nothing but thin air,
because as soon as the filament move
through the nozzle wich, by the way,
another modification that we did: silicon!
RTD Silicone gasket that we molded and
applied on the Volcano hotend, it
worked flawlessly because when we use
those fans without the silicon gasket
...no, wait, it's not a gasket sorry, it's a silicon glove that we're using;
when we didn't use those gloves, by only putting the fan speed to, let's say,
twenty percent it made the hotend
cool down so fast that the
electronic was saying "DECOUPLED" [on the display], you know, when the
thermistor goes in fault, or at least the electronic board
think so. We were trying to...
Let's go back to the carriage. It has received a
lot of improvements,
now this was a lot stiff[ier], it had those two
round fan vents over there,
the holes for the fans over there and I suggest you gonna see
the video of them running on the
facebook page and well it wasn't for the
CoreXY and it worked; it was one of the
things that worked with that system, it worked but not "that good",
I mean, the circles, they were
coming out like... let's say, an arch, then a
diagonal, another arch, another diagonal
closing the loop. It seems that that
problem was about different tension on
the two belts that move the carriage
around, and to solve that problem
I had to apply an equal tension to both
of the belts; now, since i was using
one tensioner that by moving it
here, near the corner,
I pushed the belt a lot, and added tension to
the belt. Now, so that's my tensioner, in short words,
and if I pull it more over here
I pull more tension on the topmost belt
similarly, if I pull the other one close to its nearby corner
I put tension on the lower belt.
it worked, but...
not much, the problem was still there,
all the circles being ruined and
square parts were not so good,
the best thing i got for example this
test cylinder, single wall, I don't know if you
can see it... let me see if I can make it clearer to you...
ok, now: where I'm touching the cylinder
you can see the diagonal
I was talking about, you see that there is
this sharp corner which (well, not that
sharp but...) you see there is a corner here
and one other here, close where the
layer starts and make the typical
signature of the the fiber being extruded (seam lines)
anyway, that problem was
totally making me waste a lot of time
trying to avoid it, now remember on
that printer it worked easily (the CoreXY),
smoothly and easily, on this one no.
Now, the movement [system] is the same,
the pieces very similar,
the only thing different maybe here is
that these Y carriages, they have
those V-wheels that as you can see
totally not good for this extrusion
profile, because it has a 8 millimeter hole, and
those wheels are designed for a 6mm
hole inside the profile, and
they touch the borders of that hole by a
tiny tiny tiny little part which is not
good, but - it works. Anyway, what
I'm trying to do with the NazzaBot?
I'm trying to go back to the cartesian
system. It worked nicely, I've printed
for example this Terran Marine
boot, which, by the way (thanks to my
friend Andrea) I'm about to reprint
'cause he's a serious modeler, not like me and
he did a wonderful job, you'll see
it when
the new PLA arrives, and as you can see
the whole system worked
nicely, the only thing bad was the
wobbling, because at that time i still had
that the old build plate, which now rests
here, disassembled,
we'll use its parts to build another
printer with those profiles; let me
show you a comparison between
that one and this one, eheh, it is quite a lot
stiffier than the old one, isn't it?
Combining all the things I've learned with
the CoreXY I'm trying to develop these
new Y carriages, which will have, as you
can see, the X motor over it. Now some of
you may think that it will be a problem,
because added mass produces a lot more
inertia, and that's a problem when you're moving,
you are prone to phenomena like ringing,
or maybe print skewing if you
don't... pass me the term, "brake" good enough
when changing direction of
one axis, and, well, it's all about acceleration, so
"in the old days" we had two extruders,
two motors, now we have one. If you're asking
why it's because I tried to print a woman
statue on the printer, and one of
the extruders, the one
which was not excluding was hitting
the print,
[blabble] it was hitting it a lot,
it smashed it so much times that
after... let's say, 20cm in the print (still at the legs, didn't waste too much material)
one of the legs fell off the build plate, and totally ruined
the print; so that's why I'm moving to
one nozzle, that's also something I've been
seeing around now, this is becoming a standard,
maybe because it's easier than leveling two nozzles
on the same plane, it's a tremendous job,
something literally anyone is trying to avoid [unless they have nozzles very close to each other]
and maybe do as many people are doing now,
one hotend, multiple filaments, it could be a solution.
The use case scenario for this printer should be printing
parts that will be post-produced later,
for example by sanding, adding plaster, adding paint, sanding again,
whatever - for example for printing those big parts and not something that you just print and put on a shelf,
well, I did it with that one
it's a trash, because it doesn't
fit, it's too small
next time think twice before printing, Edoardo
anyway, the best solution I've seen so far for this one
is to totally avoid dual extrusion, one seems enough for now,
so I have just one extruder motor now,
and that helps, you know why? Because of less mass,
but also less concerns,
the first time I used 8 cables for each hotend,
we have 40 cable here,
standard IDE drive cable
on older computers, still the same cable, now I can
use more if I want but never found the need for for
more than eight of them so maybe I will
use the extra cables for something like more power to
the fans, or for example more things like LEDs,
or maybe what about proximity
sensor? That sounds like a nice addition and that's
exactly what I'm about to try, not on
this one carriage but on the new one I'm
printing right now...? No, not printing right now
sorry, it will be printed shortly and this
one was the last CoreXY [shuttle] which made me
proud at the time, about
the carriage design made me proud, not
the whole printer, it's sounds lovely,
you can see double fans, one extruder,
and it had on the fans - you can't see it on here
the part is missing of course,
on the bottom part there is the
attachment for this sensor, which I read
about them and then started studying it and try to use
on this build plate, because remember
this is not full aluminum, this is a D-BOND
there is a tiny sheet of aluminum
on the upper and the bottom part
and... should be styrene foam
in the middle. Should work anyway. So well
that's all for now,
sorry for contrapting so much
information so fast in one video, maybe I
will print... ehm,
I'll make videos more often, maybe with a slightly
lower pace and make them more understandeable. Well,
'till next time, bye bye!
 For more infomation >> CHEAT DAY| TOUT EST PERMIS - Duration: 8:42.
 For more infomation >> For These Drying Times
 For more infomation >> A força do autoconhecimento – Mestres El Morya e Portia - Duration: 9:22.
  For more infomation >> I DYED MY HAIR USING COLOR CHALKS - Duration: 11:15.
  For more infomation >> Shadowhunters 2x01 Sneak Peek #3 // Clary and Izzy [SUB ITA] - Duration: 2:30.
  For more infomation >> GOHAN WILL GO TO MITAR IN THE POWER TOURNAMENT? - Dragon Ball Super Theories | TeoriaTV - Duration: 5:25.
  For more infomation >> Silent - Tori Kelly ( Cover - Marcos Lyra) - Duration: 3:37.
  For more infomation >> caminhao de brinquedo | patrola de brinquedo/trator de brinquedo/escavadeira de brinquedo infantil - Duration: 10:30.
  For more infomation >> 【MMD MLP x FNAF】Happy Synthesizer『+ DL』 - Duration: 3:56.
  For more infomation >> FOR HONOR | Un Gioco Troppo Sottovalutato! - Duration: 6:56.
  For more infomation >> Water detox for the summer !! By erika souza ( mundo das fashion ) - Duration: 1:22.
  For more infomation >> Refuze - WOLF - Magister Ludi - Mp3 Versie - Duration: 2:12.

 For more infomation >> VÍDEO EXPOPET - Duration: 4:16.
  For more infomation >> SuddenShows playing Rocket League #1 - Duration: 14:05.



 For more infomation >> London to introduce £10 vehicle pollution charge - Duration: 1:46.


 For more infomation >> ⎰CHALLENGE n°7⎱Vodka ou tequila ? - Duration: 9:57.
 For more infomation >> take on take on take on meme - Duration: 3:51.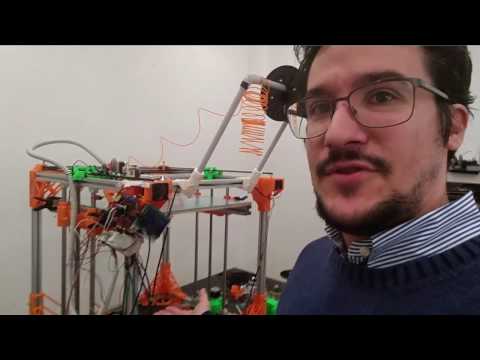

No comments:
Post a Comment