SoniBros FX Studio Noida 0120-4380733, 9582863707
Outlast 2
Subscribe to:
Post Comments (Atom)
-------------------------------------------
Limca's New Most Funny Ad ft. Nidhi Singh | TVC Ep 34 - Duration: 2:17.
Limca's New Most Funny Ad ft. Nidhi Singh | TVC Ep 34
Limca's New Most Funny Ad ft. Nidhi Singh | TVC Ep 34
Limca's New Most Funny Ad ft. Nidhi Singh | TVC Ep 34
-------------------------------------------
Outlast 2 | 絕命精神病院2 | #6 - Duration: 19:55.
Outlast 2
-------------------------------------------
Partita a carte finita male- 15 e 18 quanto fa? Coglione - Bestemmie in Veneto - Duration: 1:10. For more infomation >> Partita a carte finita male- 15 e 18 quanto fa? Coglione - Bestemmie in Veneto - Duration: 1:10.
 -------------------------------------------
La Vecchia Topina - Canzoni e cartoni animati per bambini - Duration: 34:06. For more infomation >> La Vecchia Topina - Canzoni e cartoni animati per bambini - Duration: 34:06.
 -------------------------------------------
Angeli e Tarocchi lettura dal 08 al 14 Maggio'17 - Duration: 27:40. For more infomation >> Angeli e Tarocchi lettura dal 08 al 14 Maggio'17 - Duration: 27:40.
 -------------------------------------------
MINECRAFT : SKYREALMS #11 - ECCO COME COMPLETARE LE MISSIONI VELOCEMENTE ! - Duration: 18:43. For more infomation >> MINECRAFT : SKYREALMS #11 - ECCO COME COMPLETARE LE MISSIONI VELOCEMENTE ! - Duration: 18:43.
 -------------------------------------------
Artesplorazioni: manierismo - Duration: 3:05. For more infomation >> Artesplorazioni: manierismo - Duration: 3:05.
 -------------------------------------------
Martsa ng pagkakaisa - Marcha da solidariedade [Subtítulos] - Duration: 2:31.
March of Solidarity
We advance the solidarity...
...of the working class and peasantry.
Our base in the struggle...
...for the national democracy!
They are the possessors of the true force...
...to smash imperialism,
bureaucrat capitalism, feudalism,
the pestilence that kills!
From the mountain and the villages...
...we advance like waves,
to besiege and liberate...
...our cities!
And we will establish a free society,
a socialist revolution...
...until eliminate exploitation!
We advance the solidarity of the working class and peasantry.
Our base in the struggle for the national democracy!
They are the possessors of the true force to smash imperialism,
bureaucrat capitalism, feudalism, the pestilence that kills!
From the mountain and the villages we advance like waves,
to besiege and liberate our cities.
And we will establish a free society,
a socialist revolution until eliminate exploitation!
And we will establish a free society, a socialist revolution until eliminate exploitation!
-------------------------------------------
BLADDE - VREMEPLOV (OFFICIAL VIDEO) - Duration: 3:34. For more infomation >> BLADDE - VREMEPLOV (OFFICIAL VIDEO) - Duration: 3:34.
 -------------------------------------------
Начало отношений Как вести себя с мужчиной Женские ошибки в начале отношений с мужчиной - Duration: 2:07. For more infomation >> Начало отношений Как вести себя с мужчиной Женские ошибки в начале отношений с мужчиной - Duration: 2:07.
 -------------------------------------------
Dobry Reportaż #22 - Tajemnice Jeziora Żywieckiego - Duration: 5:41. For more infomation >> Dobry Reportaż #22 - Tajemnice Jeziora Żywieckiego - Duration: 5:41.
 -------------------------------------------
BÖ - E'TELU | ORİJİNAL TÜRKÇE ALTYAZI [HD] - Duration: 2:21. For more infomation >> BÖ - E'TELU | ORİJİNAL TÜRKÇE ALTYAZI [HD] - Duration: 2:21.
 -------------------------------------------
1X01 - Camus - Lo straniero - La morte dell'arabo - Duration: 4:01. For more infomation >> 1X01 - Camus - Lo straniero - La morte dell'arabo - Duration: 4:01.
 -------------------------------------------
跟我去歐遊 Ep3| BRUSSELS, AMSTERDAM, LUXEMBOURG| DAY 3 | EASTER BREAK TRIP TO EUROPE | TRAVEL VLOG - Duration: 7:41. For more infomation >> 跟我去歐遊 Ep3| BRUSSELS, AMSTERDAM, LUXEMBOURG| DAY 3 | EASTER BREAK TRIP TO EUROPE | TRAVEL VLOG - Duration: 7:41.
 -------------------------------------------
מה הסיפור של G2A? - Duration: 5:19. For more infomation >> מה הסיפור של G2A? - Duration: 5:19.
 -------------------------------------------
Ramayana The Extract Trailer | Vijay Varma | Anjali Raghav | Vishnu Shankar Belu - Duration: 2:44.
SoniBros FX Studio Noida 0120-4380733, 9582863707
-------------------------------------------
Limca's New Most Funny Ad ft. Nidhi Singh | TVC Ep 34 - Duration: 2:17.Limca's New Most Funny Ad ft. Nidhi Singh | TVC Ep 34
Limca's New Most Funny Ad ft. Nidhi Singh | TVC Ep 34
Limca's New Most Funny Ad ft. Nidhi Singh | TVC Ep 34
-------------------------------------------
Outlast 2 | 絕命精神病院2 | #6 - Duration: 19:55.Outlast 2
-------------------------------------------
How to tune ms41 ECUs (BMW m52/s52 engines): changing bigger injectors - Duration: 25:01.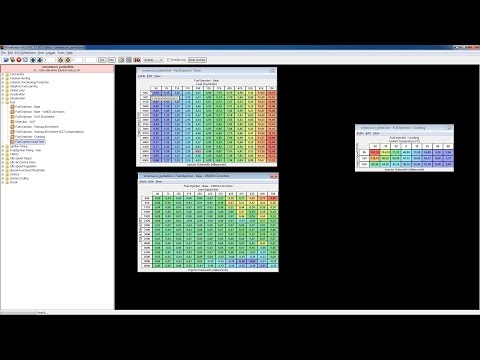
Welcome back to Sipa's garage.
This time i'm going to show how to make bigger injectors work in ms41 siemens.
The stock pink injectors in these m52 engines are so small that they can't provide fuel for big HP numbers.
And if you wan't to convert the engine to run e85, they aren't enough even for stock engine.
The stock injectors flow about 200cc @ 3bar of fuel pressure.
And somewhere between 220 - 230 cc @ 3,5 bar fuel pressure.
Which is the stock fuel pressure in these.
I managed to find from eBay these blue injectors which are meant for some turbo Volvo.
I haven't found some real cc/min flow numbers for these.
But these should flow about 350-370 cc.
@ 3bar so it will about 400 cc at 3,5 bar of fuel pressure.
So these are close to double the size of the stock injectors.
These are used ones from some LS v8 engine so that's why there is 8 of these. But i only need 6 of these.
And these were only 70 USD plus shipping so really inexpensive upgrade.
But lets first install these and then I will show how to tune the ms41 to make these work.
here we have the patient for today.
Which is m52b28 engine in my daily e36.
As you can see, I have swapped m50 intake manifold to this.
Then I have throttle body that has been drilled to bigger bore.
And also i have some eBay headers that you can't see now.
And in addition to those I have intake cam from s52.
And then as exhaust cam I have modified intake cam m50b25 engine without vanos.
Basically those are now equal to s52 cams but in that way I didn't have to pay as much.
I have tried to tune this and with my cam timing it looks like I'm maxing out the MAF sensor.
And the stock injectors are very close to their limit, so that's why I got those bigger injectors.
And at least in Finland the regular gas is expensive and e85 is half less expensive.
So I will plan to convert this to run on e85 and I need the bigger injectors for that also.
And in future i'm going to make this 3 litre high compression stroker running e85, so these new injectors will be enough for that also.
But ok that's enough talk. The injectors are under this plastic cover so lets get working by removing that first.
As I said I have the m50 intake manifold in this but I still have the m52 fuel rail, so that's why this looks bit DIY.
And these lambda connectors are in wrong place because with the eBay headers, the lambda wires were too short.
And if someone hasn't ever changed any injectors in these.
These electrical connectors have this little clip that doesn't open by pressing it like in these normal connects.
But you have to pry this open by small flat head screwdriver.
Which is very awkward.
And this also likes to go back in the slot.
So i like to remove these clips completely so that I can easily lift this plastic rail.
Then in the injector itself.
Or in the fuel rail.
There are these retaining clips.
Which are keeping the injectors in place.
And if I remove it, the injector should just pull out.
I just need to get some tray under here so that I don't get fuel everywhere.
Like this.
And I will just pull out the injector.
The fuel can come out quite fast because it's pressurized.
Come on.
Like that.
I will let the fuel drain out.
And repeat that 5 times.
Now all the injectors are off.
Lets first check that these new ones are the same length.
Yeas they are.
And the connector is same.
So these are ready to go in.
You can see clear difference in here.
These stock ones are Bosch ev1 injectors.
And these are Bosch ev6
So here you can see evolution between these.
The new ones are lot lighter and smaller.
But these should slide right in.
When installing new injectors, I recommend to put some lubricant to the rubber seals.
I normally use Vaseline, but now i don't have it, so I use bike chain grease.
But this is just that the injectors would slide in easily.
And these are ok.
I will put this in.
And it did slide in really easily.
Then the retaining clip.
Like that.
Let's make sure it can't come out.
The clip seems to fit correctly so it can't come out.
So it's ok.
I will rotate this to face right way.
And then the rest go in same way.
now the injectors are installed to the fuel rail, and I can push this whole assembly in.
I will just line this.
This should go in easily because I lubricated the seals.
And it's in.
I will line these straight.
Then I need to put in the plastic rail with the connects.
But first I will need to put back in the clips I removed.
And now this should just snap in place.
it's in.
I will connect the vanos wire also.
And the lambda sensors of course.
And it should start now.
But first I will assemble rest of this.
And everything is ready, so next I will show how to get those new injectors working in the stock ECU.
And now we have the RomRaider opened and If I just shortly say what we are going to do next.
Is that we need to reduce the injector opening times in same relation as the new injectors are bigger than the stock injectors.
To do that lets first see what kind of maps we have here at the fuel section.
This is the Base fuel map.
Looks like that.
Then is VANOS correction map.
WOT enrichment map.
The WOT detection map.
Then there is warm up enrichment maps, ..
cranking fuel map..
and lastly the injector dead time.
The dead time maps which is at top is unique for each injector model.
So you need to edit this if you change injectors.
Lets first see how the map is for these injectors.
Here in excel I have the dead times for the stock injectors.
And under here I have few values that I found for these new injectors.
unfortunately didn't found more info.
But if you look these the values are really close to each other.
So with this information I won't even touch the dead time values.
So I will stick with the stock map for now.
I will edit if that doesn't work.
Then we have the cranking fuel map.
Under the map it says that "Injector pulsewidth (milliseconds).
So the injector size will have effect on this map.
So we need to edit this one.
Then we have the warm up maps.
It says multiplicative factor.
So if other maps are ok, it just multiplies values according to these maps so we don't need to touch these.
So close that.
This second warm up maps is enrichment in %.
So basically same thing so no need to touch that too.
Then there is the WOT detection map.
Which just tells how much you need to apply throttle to enable WOT enrichment.
So in this case we don't need to touch that one.
Here is WOT enrichment table.
Which tells how much richer the car runs in WOT.
But this is also in % so when we are changing bigger injectors, we don't need to touch this.
So only maps left are VANOS correction map and base fuel map.
These are both "injector pulsewidth in milliseconds."
Which means that these need to be correct for different size injectors.
Especially the base fuel map is the one we need to adjust now.
But it's also good to adjust the VANOS correction map.
Lets start this by selecting all the values in the map.
Click "copy selection"
And then we go the Excel and paste the map here.
Yeah that worked.
Then I will copy the VANOS map.
You can also use Ctrl+C
Like this.
And lastly the cranking map.
Like that.
now here in top left corner I have the part number for the stock pink injectors.
And the flow capacity for those.
You can use cc/min or what you want but I have g/min/3bar because that's how Bosch tells the injector flow.
And i found that for the flow for stock pink injectors is 150 g/min.
And down here I have the flow of those new blue injectors.
And we now know how much we need to scale down our maps.
Just by dividing the smaller value b the bigger one.
I will just write the formula for the Excel.
Not 7. I meant slash.
And it's 0,57 so these are almost double the size of the stock ones.
And how to use this value.
It's simple. We just multiply the maps by using this value and we should have working maps.
So I will just make new map.
By first copying this "selection 3D" here so we can paste the map in RomRaider.
To there and then I can write the formula.
So first comes the injector ratio we calculated. Which is E...
..8 is it. Yes.
And we multiply this by the first cell.
So C13..
Oh! it now complains something.
What the fuck.
Wait a minute.
Yeah the Ecxel again confuses the dot and comma.
This is really strange because sometimes this works and sometimes not. Normally it doesn't and you need to change back and forth.
I will change that.
Now it shows it correctly.
I will just pull this down and create the map.
This one way to do this.
Oh there was one missing.
I will now speed this up so this doesn't take all day.
Then the VANOS correction map.
And we can do this whole map in one go like this.
And then the cranking map.
I need to change the cell address here.
Like that.
And I can open the whole map. Oh damn..
And it's ready.
And now I just need to copy the maps to RomRaider.
From the selection 3D copy the map.
Oh I missed it again.
Like that and Ctrl+C
And paste to RomRaider.
Ok. Why the fuck it won't work.
Whaat.
Wait a minute.
Oh it must be the decimal separator again.
Change that back.
And you don't work at all.
Fuck this...
Change this back.
ok.
ok it doesn't work. I may need to copy the maps to Excel with different setting.
I will first change this.
And I will go to RomRaider.
I will try to copy this again.
And paste here. No it still wont work.
Is the another way correct.
Then paste.
ok and now you did work with the original setting.
I don't really know why this sometimes work and sometimes not.
I will copy these other ones again.
That one went ok.
Then the cranking map.
it's ok and lets try to copy the modified maps to RomRaider again.
no wait.
Is the other one correct for paste.
All looks good.
One more try.
Yeah finally it works.
Usually this works like a charm but sometimes this is a battle.
I don't know if it's RomRaider, Excel or Windows.
But after trying different things it works.
And paste that and we ave all three maps modified.
These maps should now work with the new injectors.
it probably wont be perfect but it should work.
I will save that and load that again to make sure that the changes were saved.
This one.
I will check the fuel maps.
That one is ok.
This also.
And the last one.. Yeah that is ok.
Now we can flash this to the car and see if it works.
And here we have again this my basic setup for flashing ms41.
I will enable the flashing here.
I will then open the Siemens ms41 flash tool.
yes.. file...
..partial..
Flash ECU.
I will choose the bin we modified.
Open..
And it started flashing.
yes..
Lets wait a minute.
And it flashed it. Now just turn the ignition off, push the car outside and lets see if it runs.
Hopefully our maps are ok.
Yeah it started and worked really well.
It did work with just those maps calculated in Excel.
But lets still look how the adaptations are now with those maps.
Here I have screenshot from Testo with stock injectors.
The additive adaptations are at 1 but I have no idea what that means.
But the multiplicative adaptations are in % but in testo you have to divide that by two.
So the bank 1 is really minus 1,5%
And the bank two is 3% on the plus side.
So the adaptations are close to zero as they should be.
Which means everything works as it should.
And here I have the adaptations taken by RomRaider logger with new injectors.
And it looks like both adaptations are on the plus side. First bank bit over 5 % and second bit over 7 %
Which means that our maps are little bit on the lean side.
So wee need to raise up our maps.
Which is easy just by opening the Excel sheet we did have.
And we multiply this ratio by 1.06 which should get our adaptations close to zero.
And now just copy these maps to RomRaider again.
Same way as before.
Now it's little bit richer.
These two also.
To RomRaider.
lastly the cranking map.
Then I will just save this new version.
And flash that in. Then after driving a while lets see how our adaptations look.
So just save.
And it's ready to be flashed.
Okay and with those maps multiplied by that 1,06 the adaptations were close to zero.
I didn't take a screenshot but other was about 1% positive side and second 1 % at negative side.
So the maps are ok and engine works as it should so no need for more tuning this time.
This may need few more iterations checking those adaptations.
But this time we got away easily.
So if the values we use to calculate are correct, this should be really easy.
Maybe in next part we check how to tune the ignition advance or something like that.
So more ms41 tuning videos are coming.
-------------------------------------------
Alan Walker - Faded (Piano Cover) - Duration: 4:35.
Sorry guys , this is my first time to use piano sofware so the piano part isn't FHD
Thanks for watching!!!
If you like this video, give me a like, subscribe and share. Thx a lot.
-------------------------------------------
Katyusha - Duration: 8:29.
Except you have to get it first And what does that look like?
Gaijin.
Why have you forsaken us
In case you've been living under a rock since yesterday, everyone and their mother
is going crazy over this Russian milk truck, also known as the Katyusha.
Yes, that truck you see on Poland, that's an actual playable vehicle now.
Oh but you can't simply buy it, no no no.
The Katyusha is special, so you have to unlock it.
And how do you do that you ask?
Oh it's simple, you just have to suffer actual damnation to arcade rocket spam hell
This is the Katyusha's smaller cousin, the BM-8.
I did a video on this thing before giving it a full review, but in short, This thing
is f**king awful.
You get a "tank" with virtually no armour, 2 crew and 24 rockets with only 24mm penetration
at battle rating 2.3. you know what has more than 24mm of armour?
Almost every single tank you're ever going to face.
Thankfully due to literally every single match being full of these little buggers you are
currently not facing that many unkillable tanks.
The bad news is, you'll die just as easily to their rockets as they do to yours.
And Gaijin, in their eternal wisdom, requires you to get 5 kills in a single game in order
to unlock the milk truck.
5.
In what is possibly one of the worst tanks in the game.
Try it in realistic mode?
Nope, since everybody is spamming the BM-8 you can't get into a game, and when you
do you face tanks you can't pen anyways.
Try it in arcade?
Well, that's what everybody else is doing.
But between the utter chaos, everybody fighting for kills and people just quitting back to
hanger after dying once, you actually getting the 5 kills required in one match is a complete
game of chance.
You either die immediately, or you run out of enemies to shoot at.
Over and over and over again.
Now there is another way.
The smart people over at my discord which you should by the way totally join have devised
a devious plan.
They just got together, filled a simulator mode lobby and farmed kills on each other
until everybody had the Katyusha.
But me, well, I did it the hard way The match you've been seeing in the background
was the match that I finally managed to get 5 kills in after what felt like an eternity
of suffering and wanting to bash my head against a wall.
And somehow I managed to get teamkilled in arcade too, almost ruining my chances.
But anyways, rage aside, is the Katyusha worth getting?
No, no it isn't.
Well, that's not entirely true.
If you're expecting this thing to be a good vehicle you can get lots of kills with, don't
even bother.
You don't have armour, and I mean even less than the BM-8, you only have two crew in the
cabin, you have extremely limited traverse, you're a huge target, you have a positive
gun depression (yes you heard that right) and cant actually hit anything within 200m
unless you back your rear up against a wall or do some breaking whilst firing, and since
this thing only has wheels it's a bit awkward to drive too.
And whilst you get bigger rockets than its smaller cousin, the 39mm of penetration aren't
all that effective at the 3.7 battle rating this thing sits at.
But what this thing lacks in actual effectiveness, it compensates with in stronk soviet meme
power.
Here's some of the fun stuff you can do:
If you want to grab yourself the legendary Katyusha, read the news post that's linked
in the description for more information.
This is one of those vehicles that's just awful to get, but if you even slightly care
about cheeki breeki, you simply must have.
Thanks to my community on discord for being awesome and helping each other out in getting
this challenge done as well as setting up the custom battle versus bombers, and special
thanks to my patreon supporter and long term mod 100Dampf for helping me record the Tiger
clip.
If you want to be a part of this awesome community, feel free to join the Discord with the link
in the description.
As always you sexy beasts, my name has been MikeGoesBoom, thanks for watching!
-------------------------------------------
Japanese artist Kusama Yayoi exhibition. - Duration: 9:02.
Hi everyone. It is Yurya Blinchik.
I am close to the National Museum of Art in Tokyo.
Because they are holding the exhibitions of the famous Japanese artists.
Yayoi Kusama looks unique artists that is well known all over the world.
One of her art work was sold for more then 5 million doll.
The entrance is lined with trees decorated Kusama Yayoi's dot style.
Here is also the photo of Kusama Yayoi.
It is a very flashy person.
I can not help but say, Ms. Kusama has the mental illness from birth.
And all represents from the hallucinations she saw are appear in her works..
Kusama's art has an unique taste for this reason.
If you also see her works, you might feel a world of madness of Yayoi Kusama.
Let's go in.
The National Museum of Art looks like a very fashionable place.
Actually, I came for the first time here.
Very beautiful forms inside too.
I wonder if these balls are also related to Yayoi Kusama exhibition.
The name of the exhibition is "My eternal soul."
Unfortunately it forbidden to take pictures of all of the works, only this room is ok.
How do you think? Do you feel something special?
You might realized a lot of dots at Kusama's works.
And you might see a variety of strage existence if you look a little closer.
As I said before, all of them came from Kusama's hallucinations.
When you look at this picture, you'll see the world as it sees Yayoi Kusama.
There are many repetitions and psychedelic colors.
And a lot of eyes!
I'm a little scared. Feels like a nightmare.
Even so, all waorks are very colorful.
This art is also full of eyes.
She really likes very small objects.
It is the number of eyes when you view nearby.
All these works look very easy to paint, but in fact, alI these works are too crazy to be made by normal artist.
How much time it took for make one such work?
Even though I am illustrator, I was surprised to all these small details. After all, Kusama's art is really amazing.
Also Kusama Yayoi is famous for her art installations.
By the way, she has started to draw dots even on her house furniture from the childhood.
Later that dot art has became her unique well known style.
But Kusama had created works in a variety of styles, but the dot style has become the most popular in the world.
If you are interested, please try to find them in internet.
Looks like I have a stalker.
There are eyes everywhere, they are looking at me at the same time from various places.
Eyes again! I'm scared.
The exhibition room that can not be shooted show the early works of Kusama Yayoi.
And her early works are not so colorful.
Kusama, who noticed her mental illness, had got a great depression.
In order to escape from thehallucinations, she had started to picture them.
Works of those days were very dark. There were a lot of black and red colors.
After she admitted here own body condition, Kusama's work got more originality, and she finally found her own style.
She changed for pop art, and started to make more colorful paintings.
If you compare the older and the current works, you will realize the progress of Kusama's as an artist.
You still have a chance to see it if you come to National Museum of Art in Tokyo.
By the way, Yayoi Kusama is not only the artist. Also she has worked as a director of short movies and writer.
And now I have just seen her 5 minutes movie.
Yayoi Kusama's took off the clothes until naked, draw some dots on the body, rode a horse drawn by a dots too.
Suddenly the dotted cat crossed the road.
It is the explosion of the dots.
If you want to be like Yayoi Kusama, this room is a chance.
Because everyone one who enters these room, gets such stickers. And you can put It everywhere inside of this room.
There is almost no free place.
But I want to put it anyway..
How about curtain?
Works of Kusama Yayoi are really great. There are a lot of space distortion works in the other exhibition rooms.
Impressed too much, my body in the middle of looking lose it's balance. There was also the moment when I was about to fall down.
If you see works of Yayoi Kusama in reality, you might also get such a hallucination feeling.
How was It? Yayoi Kusama is 90-year-old soon, but she still continues to making her amazing works.
Living in a mental hospital in Tokyo, she works in the near own art studio.
Did you like arts of Kusama Yayoi? Please write the comment. Don't forget to like the video.
See you soon, Bye!
-------------------------------------------
Limca's New Most Funny Ad ft. Nidhi Singh | TVC Ep 34 - Duration: 2:17.Limca's New Most Funny Ad ft. Nidhi Singh | TVC Ep 34
Limca's New Most Funny Ad ft. Nidhi Singh | TVC Ep 34
Limca's New Most Funny Ad ft. Nidhi Singh | TVC Ep 34
-------------------------------------------
GTA V: How To Use Greenscreen Mod For Machinimas [TUTORIAL / Rockstar Editor] - Duration: 9:07.
Guy: "Hey, why is your office under water?"
Michael: "You define everything that's wrong with this place"
Guy: "Is this your wife?"
Michael: "You wanna make something outta this?"
Hello there guys and girls,
in this video I would like to introduce you to an amazing mod which is absolutely underrated
and underused in my opinion.
With the greenscreen mod by nnuu you can enhance your videos big time and get mighty creative.
I'll take you through the process in five steps:
Firstly, I'll show you how to install the mod which is fairly easy.
Secondly, I'll show you how to find the modded objects and save them to your favorites.
In the third step you'll learn how to build big green screen setups.
Step four will be about how to position your cameras in Rockstar Editor.
And last but not least I will show you how to key your footage within professional editing
software.
If you want to see another example video where I used green screens, please click the info
card on the upper right.
The clip is called Trevor's Special Treatment.
Also, you will find the links to all mods in the video description.
Let's go!
Step 1
The installation of the mod is pretty easy as always and if you're ready to use greenscreens
in your videos I'm assuming you know how to mod your game.
So here's just a quick info on how to do it:
Once you've downloaded the mod you can decide yourself which files you'd like to install.
For starters, you should go for the ones placed in the folder green_screens.
Each object has got an individual installation path.
Start up Open IV, navigate to a folder and click on edit mode.
Now, Open IV will prompt you to copy the archive to the mods folder, which you should agree
to.
Now, you just drag and drop the files into the folder in Open IV and the changes are
saved automatically.
Rinse and repeat for the other two green screens.
Step 2
Leave the window with the mods open in your explorer, as you'll need those file names
in just a minute.
You can also write them down on a piece of paper.
Boot up the game and start menyoo.
Navigate to object spooner and spawn a new entity into the world.
With the search function you'll now find the modded objects very fast.
So for instance just type prop_hanger_door here and the correct object should show.
Add this object to your favorites by pressing b for boomschlabalaba!
Rinse and repeat for the other two greenscreens.
Step 3
Now, depending on the size of your scene you can use these different objects.
If you just want to film a single person, prop_ld_greenscreen is perfect.
Spawn the object and walk onto the green area.
In order to get a clean keying result later on, you should also adjust the time of day
with menyoo.
Please don't try to record green screen stuff with a night setting as this is going
to turn out horribly.
So, adjust the time of day in a way that the contrast between the person and the green
screen is big enough.
When positioning the sun in the air you should watch out that the shadow of the player won't
touch the back wall as this will make it harder to get a clean keying result.
This also works the other way around, so you can set a desired time of day and position
the green screen accordingly with menyoo.
If the shadow at the bottom annoys you, there is a little workaround as well.
You can spawn a huge object like the UFO or spinning anus as it is called in simple trainer
by sjaak and place it as your new floor to walk on.
I'm spawning this object with the simple trainer so it won't appear in the database
of menyoo.
That would confuse me as I'm a sensible being.
As soon as the UFO is positioned correctly you can make it invisible and boom!
The shadow below your character is projected far enough away so it doesn't disturb your
keying later on and you can walk on the UFO normally.
Step 4
When editing your greenscreen footage in the Rockstar editor there's a few things I would
like to tell you.
First of all, you always have to place your camera in a way that makes sense with the
background image you're using.
So if you wanna show Franklin standing around in a real life city, you must match the perspective
to the background footage.
It would make no sense to film Franklin from a high angle because the camera in the original
footage was at head or chest level.
This is one of the main challenges of working with green screens because it requires you
to think ahead.
It will take practice.
Secondly you don't need to worry if your camera shot isn't completely filled with
the green screen, as long as the object or person you're trying to key out is completely
surrounded by green.
For instance this area around here can be keyed out with a mask later on.
If your character goes out of bounds on the green, you must either reposition the camera
or build a bigger green screen next time.
Step 5
Once your green screen footage is exported, you just import it in your editing software.
I'm using an older version of premiere pro here.
For more complex animations you can also use the footage with after effects but that would
go too far to explain in this video.
Put the clip into your timeline and then go to the effects panel.
Type "key" in the search bar and you should find the color key.
Drag and drop this effect onto your clip and then access the settings for this clip.
You'll see that you don't see anything.
Wuuuuut?
Don't worry.
Click the little eyedropper or pipette icon and select the green screen in the preview
window.
Now you'll have to adjust the tolerance of the color.
The higher you set the value, the more color is eaten away.
For better results you should soften up the edges a little bit as well.
Just experiment with what will work best.
It always depends on your footage.
You can also copy paste the color key and select two different colors.
This will help you with the shadows below your character for instance.
Just select the darker green and adjust the tolerance again.
Both of these color keys will then work hand in hand.
This also means that you should not try to record green cars or people with green clothes
in front of a green screen.
So, don't try to make a movie about the Grove Street Family.
[oooh] Don't worry!
There is a workaround for this, too.
You can take one of the green screen objects and change the texture from green to blue.
Since I'm a good guy and since I'm too lazy to explain this shit in here I've already
done that for you.
Please go to the link shown in the info card right now to download a blue screen.
Installation and use of these files works equivalently to the green screens obviously.
With the blue screens you can use green cars now, but for some weird reason you can't
use blue cars anymore.
Hmmm…
Now to match up both layers of your footage, background and foreground, you will also have
to do some color grading.
In the opening clip the office was underwater.
That's why I added a blue tint to the front layer so it would look more convincing as
if they were actually under water.
This is an essential step to successfully working with greenscreens.
One more thing in the video editing section and then I'll release you into freedom:
If you want to put additional effects on your keyed footage, don't apply it directly to
the keyed footage.
For instance if you soften the video it will show the edges of the green screen again.
Instead you must use nesting for this sequence.
This will put your keyed footage inside a sub sequence.
If you apply the softener to the superior sequence, the green background won't show
anymore.
Wow, that was a lot of input in a short amount of time.
Uh, here, have another laugh:
Guy on stage: "A man is at a restaurant and says: 'waiter, there is a button in
my salad'.
The waiter replies 'don't worry sir, it's part of the dressing'"
thank you for watching, whanowa over
-------------------------------------------
The Ending Of Guardians Of The Galaxy Vol. 2 Explained - Duration: 6:00.
With the release of Guardians of the Galaxy Vol. 2, Marvel Studios has cemented its ability
to take pretty much any random character in its vast publishing history and turn it into
a blockbuster event.
While it's not surprising that the second movie starring the Guardians was a hit, the
movie's end did raise some interesting questions — both within the Marvel Cinematic Universe,
as well as our own, much more boring, terrifying reality.
What kinds of questions?
These questions, dummy!
"What are you doing?"
"Dance off bro, me and you!"
Oh, and, before we get into the real nitty-gritty, just remember: there are obviously spoilers
ahead.
Ego on Earth
When Star-Lord's dad, Ego the Living Planet, enacted his scheme to take over the universe
with big, blobby versions of himself, we got a glimpse of total chaos erupting in Missouri
on Earth.
What we didn't see, however, was the response of any of Earth's many, many superpowered
people.
Scarlet Witch, Hawkeye, the Vision — none of the Avengers were anywhere to be found.
Even Ant-Man couldn't apparently be bothered to put in an appearance.
Unless he was there, but was just, like, too small for us to see…
Anyway, let's get back on topic.
The lack of a superheroic response on Earth was conspicuous by its absence.
So when, if ever, will we follow up on the giant blob-splosion that occurred in Missouri
as a result of Quills' crappy dad?
Probably not in Thor: Ragnarok, which seems to take place almost exclusively away from
Earth.
Will Peter Parker flip past news of the disaster while he's watching TV in Spider-Man: Homecoming?
We know that the Guardians of the Galaxy will have some sort of presence in the upcoming
Avengers: Infinity War, so dealing with the Ego-blob's aftermath may give the spacefaring
heroes the excuse to get involved with events on Earth.
And while we're on that subject…
Nebula on the hunt
By the end of the film, Gamora's sister Nebula is essentially a member of the Guardians,
even if no one really likes her very much.
But she still leaves to punish Thanos for putting her through hell her entire life.
Actress Karen Gillan has already confirmed that she'll appear in Infinity War, so she
must be colliding with Thanos one way or another once that movie debuts in 2018.
And that's yet another potential way for the Guardians to get mixed up with the rest of
Earth's mightiest heroes.
Star-Lord's status
We'd had hints that Star-Lord had some pretty heavy-duty DNA back in the first Guardians
of the Galaxy.
There have been plenty of little ones, but the biggie was when he held onto the Infinity
Stone to defeat Ronan the Accuser and somehow didn't explode into a million star-bits.
Ego made it sound like the only thing keeping hi m immortal was the living planet's glowing,
brainy core.
But is that, y'know … true?
Ego said that none of his other children had managed to retain their Celestial powers except
for Peter.
So that means Ego would have no idea how the powers of one of his children would actually
work after his own death, right?
Moreover, why would Peter lose his powers just because his deadbeat dad melted into
space sand?
If you get your dad's blue eyes, they don't fall out of your head after he kicks the bucket.
It's entirely possible that Quill is still every bit the Star-Lord he was before Ego
died.
On the other hand, if Ego is right, that opens up a whole different can of space-worms.
Peter Quill has spent his whole life being, well, him.
But if he's relied on his Celestial powers to get by in life up to this point, how will
the sudden loss of those powers affect him going forward?
Romance?
By the end of the movie, we saw Gamora finally hint that she may have the same feelings for
Star-Lord that he has for her.
But beyond that, where the relationship between these two characters goes is anybody's guess.
Conflict drives stories, and, as Peter pointed out when he referenced Sam and Diane on Cheers,
having the couple get together is usually where the story — and the audience's interest
in said relationship — ends.
Don't be surprised to see that there's actually trouble in paradise between the two when they
next appear.
And maybe someone else could come into the picture and throw a monkey wrench into the
relationship.
Like, say, Starfox, the legendary space Lothario and younger brother to a certain purple-faced
jerk named Thanos.
And while we're on the subject of romance…
No heroes necessary
In many ways, the Guardians of the Galaxy sequel confirms what we already knew: Marvel
Studios doesn't need to rely on the traditional superhero formula to make great movies.
In fact, this film was probably one of the least superheroic outings the studio has released
since the MCU started.
Sure, the gang saves the galaxy by being heroes, but this movie had much more in common with
Ghostbusters than Avengers.
And that's the thing.
Marvel Studios has access to nearly every character in the Marvel Comics library.
And they've published a whole lot of comic books over the years, including cowboy comics,
romance comics, and even cowboy romance comics back in the day.
Marvel Studios simply needs to keep making good movies to be successful.
It doesn't matter if the characters they choose are recognizable or not.
Before Guardians of the Galaxy, who'd ever heard of Drax the Destroyer or Gamora or Ronan
the Accuser, except for the geeks way in the back of the comic shop?
If Marvel wants to tap new genres featuring even more obscure characters, there's ample
proof that it can do so without too much risk.
And doing new, interesting things with big-budget movies means audiences will have more choice.
That's a win.
Filmmakers making films
Both Guardians of the Galaxy movies were very much the product of writer-director James
Gunn.
We'll probably never know for sure how much or how little input Marvel Studios had on
the script and final cut, but these are two very unique, very weird, very fun movies.
Just as Marvel Studios can branch out into different territory when it comes to the kinds
of movies it releases, it seems as though the studio is starting to truly trust its
filmmakers to deliver the goods in whatever form they think is best.
Fans definitely had reason for concern when director Edgar Wright left the Ant-Man production
in 2014 due to creative differences.
But as time goes on, that incident seems more like a fluke than anything to truly worry
about.
When it comes to Marvel movies, they'll probably be pretty good, no matter who's sitting in
the director's chair.
Thanks for watching!
Click the Looper icon to subscribe to our YouTube channel.
Plus check out all this cool stuff we know you'll love too.
-------------------------------------------
Korean government moves to extinguish forest fire - Duration: 1:55.
Efforts to extinguish a massive forest fire that spread across mountaineous parts of Korea
on Saturday continue.
While blazes in two cities are contained, the operation in Samcheok, Gangwon-do province
is hampered by dry air and strong winds.
Kim Hyesung has our top story.
Thousands of firefighters, soldiers, police officers and government officials are working
to put out the fires that have been swallowing up the mountains in two Korean provinces.
The blazes in the cities of Gangneung and Sangju have been contained as of 11 a.m.
Sunday.
Firefighters are still working to extinguish the fire in Samcheok, Gangwon-do Province,
where stronger gusts in the afternoon have made the operation difficult.
In Samcheok, over 40 hectares of land has been burned, and the Korea Forest Service
said it may dispatch more helicopters to the area, where less than 50% of the fire has
been put out.
In Gangneung, there are still some residual fires.
As of Sunday afternoon, more than thirty houses have burned... along with 50 hectares of mountainous
land in Gangneung, or an area seventy times the size of a soccer field.
More than three hundred residents were evacuated to schools and public facilities nearby and
an evacuation order has been issued to some 25-hundred Gangneung residents.
"The wind was just so strong.
The fire can't be extinguished, and I'm just so worried that my house will be burnt down
too."
The Korea Forest Service raised the forest fire warning alert to the highest level at
nine p.m on Saturday.
The forest fire in Sangju has caused one death, and wounded two people so far, and the police
are currently investigating a 57 year-old man on suspicions that he started the fire
in Sangju.
To help support the firefighting operation, the Ministry of Public Safety and Security
announced Sunday it would provide over two million U.S. dollars to the three areas.
Kim Hyesung, Arirang News.
-------------------------------------------
Photoshop Tutorial in Punjabi - Part 4 - Basic Tools 1 - Duration: 7:41.
Hello Friends
Today I'll tell you about PhotoShop Tools.
It's sifficult to tell about all the tools at once
but
I'll try to tell you about the Basics of the tools
as much as I can
First of all there's the Marquee Tool
To select the Marquee tool
Click and hold the Marquee Tool Icon
or press M key on Keyboard
Marquee Tools is a Selection Tool
It is used to make Selections
To use it
Click and drag on your Image
You can Click and Drag anywhere you want to select
and you'll see a rectangular box on it
The outline of this rectangle
We call it "Marching Ants"
Because
It looks like ants are walkin here
(Laughing)
and
You'll see
We can make Selections of any size we want
If I want to make a perfect square
then what'll I do
I'll press and Hold Shift on my Keyboard
and Click & Drag
Yuo'll see a square in a fixed ratio
So if I want to
make a square
then I'll hold Shift
Otherwise for rectangle release the shift key
Second, we have Elliptical Marquee Tool
It's just as same as Rectangular Marquee Tool
But it'll make an Oval shape or an Ellipse
Like this
and if I want to make a perfect circle
like before
Press and hold Shift
Then click & drag
See
Again I'll choose Rectangular Marquee Tool
and select this Ship
Not ship, sorry, Boat
And now
what was the need to selct it
I'll tell you
First select the Move tool
To select Move tool go to this Icon or
Press V on your Keyboard
then
Click & Drag your Selection
Drag
and you'll see
That we can Cut and Paste our Image anywhere
or what you can do
Press Ctrl + Alt on your Keyboard
and click your selection and
drag it somewhere else
Like this you can copy and paste your selection
It's a nice thing, Right?
Now I'll undo this
Then comes our Lasso tool
It is also an selection tool
but
It works in a different way
To use it
I'll click Somewhere
and drag it
where I want to select
I'll do it like a pencil or Paint brush
and you'll see Marching Ants where I've Dragged
By this I can select whatever I want
Yes but
It may be difficult for you because
we can't use Mouse with that ease
This was our Lasso tol
Then comes the Polygonal Laso tool
Polygonal Lasso tool is also like Lasso tool
The only difference is
we don't need to hold the click
we click and let it go
I'll show you how
Click.....
and again to the point from where we started
You'll see from where we started
when we reach that point again
a small circle appears near our tool's icon
Which tells us that if we click there
Our seelection will get completed
Just like this
or what you can do
Click...
in the end, Double click
with which your selection would get completed
This tool will make olny the straight to the point selctions
not like Lasso tool
Which
makes free-hand selections for you
After that comes
Megnatic Lasso tool
It is the Best out of Lasso tools
I'll Show you how
I'll start the selection by clicking once
and when I drag this forward without holding the click
it'll automatically detect
where to form the selection
I'll only click
and drag
Where there's a possibility that
it is not detecting
there I'll click again
Otherwise it automatically detects the edges
and selects automatically
Here I'll press space and drag
to move my Canvas
and again move my mouse forward while releasing the click
You'll see
It'll make the pinpoints itself
and tries to understand where to make the selections
I'll click in the corner
then in this corner
drag...
Like this
Just like polygonal lasso tool
I can
I can take it to the start point
or double click
to complete the selection
So this was our Megnatic Lasso Tool
-------------------------------------------
LG Electronics wins 20% of U.S. smartphone market in Q1 - Duration: 0:38.
LG Electronics earned its highest-ever market share in the U.S. smartphone market in the
first quarter of this year.
An encouraging result, even before the debut of its newest phone, the G6.
According to market watchers at Strategy Analytics, LG sold 7-point-3 million smartphones in the
U.S.... for a market share of 20 percent.
It was the first time LG's broke into the 20 percent range, putting it in third place
behind Apple and Samsung.
A year earlier, LG had 17 percent.
The Q1 figure doesn't include sales of the G6, which came out in North America on April
7th, so the company's market share over there is likely to grow.
-------------------------------------------
Transformers Legends LG34 Mindwipe (Takara Tomy) - Duration: 13:55.
Hello boys and girls, young and old. Welcome to yet another action figure video review.
Today we'll take a look at Transformers Legends LG34 Mindwipe from Takara Tomy!
And as you can see, Mindwipe comes with a small box. You see him here in his bat mode.
Here you see his Headmaster. Top and right, Takara Tomy.
On the top and bottom sides of the box, nothing special.
On the side of the box you see Mindwipe in his robot mode. You also see his pet with all of its features.
On the other side you see Mindwipe in his robot mode with his pet.
And on the back side of the box you see Mindwipe in all of his modes.
Enough with the box, let's see the accessories of the figure.
Mindwipe comes with this leaflet.
And of course he comes with the instructions, here they are.
Tech specs on the other side of the instructions.
Here you see a small story about Mindwipe.
And here you see his transformation.
So let's see the figure from close now.
And here we have Mindwipe in his bat mode. As you know, Mindwipe is based on the Headmasters series.
So this is his bat mode. He also comes with this pet.
We already saw it in the review of Skullcruncher so there's no need to show it again, it's exactly the same, just different colours.
So I will leave it aside.
So this is the bat mode. No articulation for this mode, it has very restricted articulation.
The only thing that you can move are the wings, they bend at three points, you can close them like this, like a bat!
You can also open its mouth. Very nice paint details, much better than the Hasbro version.
It also has Decepticon symbols here. It's nice, I like it!
The bat mode is creepy but there's something about it that I like it!
The tail is his guns, it is removable. Here they are.
This is the storage place for the Headmaster.
Come on...
This is his Headmaster. They did nice job with his face.
It's exactly the same as Mindwipe. You can place the Headmaster in here.
Place the gun as well. And you can place it to figures that transform into cities/bases.
Also, Mindwipe's bat-head is made of rubber material. Also, the edges of the wings are made of rubber material.
These wings here are made of rubber material as well.
There is no articulation on the legs because the wings are connected with the legs.
So you have to disconnect the wings from the legs and now the legs have some articulation.
As you can see the legs are on a ball-joint so they have a nice range of motion.
But yea...this is the bat mode. So let's see his robot mode as well.
First, bring the bat-head down, there is a peg here, connect it in this hole here.
Disconnect the wings and bring them up, like this.
Rotate these wings backwards.
Fold the wings inwards and this peg here will connect into this slot here.
And bring the foot down. Do the same thing to the other side as well.
And as you can see his legs are ready. Rotate the arms like this and bring them down.
Fold them out.
Rotate them from this point.
Finally, bring the fists out from here.
Place the head as well.
And Mindwipe is ready in his robot mode.
It's a nice figure, I like it very much.
It's a nice representation of Mindwipe from the Headmasters series with a more modern look.
Very nice, I like him! Of course he can hold his gun.
As for this gun, he can hold it in his hand or you can place it on the side of his arm.
As for his articulation, his head is on a ball-joint so it can rotate and can move up and down,
the typical Headmaster articulation.
The arms can rotate 360 degrees, can move up and down, they rotate at this point, we have double-jointed elbow.
There is also waist rotation. The legs can move back and forth, up and down, they rotate at the thighs,
they bend at the knee and the foot can move up and down. He has nice articulation for a deluxe class figure.
So let's see a size comparison now.
Here you see Mindwipe next to Blurr. Both of them are the Japanese versions.
And here is Mindwipe next to a voyager class figure, Generations Roadbuster and next to Revenge Of The Fallen Mindwipe.
As I said before, Mindwipe is a deluxe class figure.
So let's transform Mindwipe back into his bat mode. First, remove the Headmaster.
Close the fists inwards.
Fold the arms inwards, like this.
Rotate them from this point.
And now bring them down, like this.
Rotate the wings backwards.
Fold these wings out.
Bring these wings down...
...so this peg here will connect inside this hole and this peg here will tab in this slot here.
Bring the feet up, like this. Bring the bat-head up.
Take the Headmaster, put it in sitting-pose.
Open this panel and as you see he has a peg here it will tab in this slot here.
Close it again. Take the tail. Place the gun in this hole here.
Place the tail in this hole here.
And Mindwipe is back into his bat mode!
Final thoughts... I am satisfied with this figure, I liked it.
The bat mode is creepy but I like it. Smart engineering,
I liked the idea that the wings become the legs of the robot mode!
Nice paint details, the Takara version is superior to the Hasbro one, he is worth the money, nice figure!
Thank you all for watching, if you enjoyed this video please leave a comment or hit the like button and subscribe.
My name is Stathis, and until next time, I'll see you around! :)
-------------------------------------------
La La Land OST - City Of Stars (Piano Cover) - Duration: 2:23.
City of stars
Are you shining just for me?
City of stars
There's so much that I can't see
Who knows?
I felt it from the first embrace I shared with you
That now our dreams
They've finally come true
City of stars
Just one thing everybody wants
There in the bars
And through the smokescreen of the crowded restaurants
It's love
Yes, all we're looking for is love from someone else
A rush
A glance
A touch
A dance
A look in somebody's eyes
To light up the skies
To open the world and send it reeling
A voice that says, I'll be here
And you'll be alright
I don't care if I know
Just where I will go
'Cause all that I need is this crazy feeling
A rat-tat-tat on my heart
Think I want it to stay
City of stars
Are you shining just for me?
City of stars
never shined so brightly
-------------------------------------------
Oneplus 5 Rumors and Myths BUSTED Lets get Oneplus 5 Specs Right - Duration: 8:20.
Before we Unbox Oneplus 5 lets get the Oneplus 5 Specs right.
Lets us analyze all the Oneplus 5 news heard till date.
Oneplus 5 Rumors and Myths BUSTED Lets get Oneplus 5 Specs Right
Its too much, we have already heard many Oneplus 5 leaks and Rumors, now its time to analyze
all these news and get Oneplus 5 specs right.
What are we waiting for?, let`s begin.
OnePlus 5: Everything to expect from the next Flagship Killer.
You won�t have to wait much longer to get your hands on the OnePlus 5,
a device the company confirmed is arriving this summer.
And, no, that�s not a typo�it will be called the OnePlus 5, seeing as it will
be the fifth device in the company�s �Flagship Killer� lineup.
The OnePlus 3T was among our favorite devices of 2016, offering a gorgeous
design, slick software, and affordable price, all things we�ve come to expect from the
Chinese startup.
With the Galaxy S8 and LG G6 pushing the market in a new direction, however, it�s
clear OnePlus needs to step up its game in order to stay competitive.
We�ve already talked about what changes we want to see before the OnePlus 5 is released.
But what can we realistically expect before its
arrival in just a few months?
There have been several rumors over the past few weeks, from the inclusion of a dual camera
setup to a Snapdragon 835 chip.
Let�s wade into the deep end and see if we can make sense of what the company is going
to release.
Bezel-less is the future: Have you heard?
Bezel-less displays are the latest in high fashion, and the OnePlus 5 is expected to
jump on the trend.
The device is rumored to feature a 5.5-inch 2K display that�s light on bezels, giving
the device a more premium look.
OnePlus has yet to break away from Full HD, which means fans are in
for a big change.
Dual rear-facing cameras are better: The second most popular trend in mobile are
dual cameras, as seen in devices like the iPhone 7 Plus and LG G6.
By introducing a phone with dual cameras, the OnePlus 5 will provide users
with greater flexibility when shooting landscapes and portrait�and things should look pretty
good in low light, too.
More power: OnePlus devices have never lacked power�not counting the OnePlus X�and we�re
expecting the OnePlus 5 to include the market�s latest specs.
For one, you can bet the device will sport 6GB of RAM�rumor has it the company is even
considering an 8GB model.
The device is also expected to include
a Snapdragon 835 chip, which you can find in the Galaxy S8.
Yeah, the OnePlus 5 is going to be a very powerful indeed.
Where does the fingerprint sensor go?: With the OnePlus 5 expected to feature a bezel-less
display, the fingerprint sensor will inevitably be displaced.
The most obvious place to put it is on the front of the phone, just as we�ve seen from
so many manufacturers.
I�d be surprised if it was placed somewhere else, but you never know� Hardware changes
(maybe): This is more of a quick wishlist rather than based on rumors.
We�d love to see the device feature IP68 water and dust resistance, along with microSD
card support.
Those features may not make a difference to how you use your device everyday, but they�re
becoming standard among the market�s biggest devices, and OnePlus needs to keep pace.
Price and release: Did I mention the OnePlus 5 will be released this summer?
No specific date has been shared, but if we go on past releases,
the handset will likely hit in June.
The price is where it starts to get tricky.
The OnePlus 3T was the company�s most expensive device at $439.
With the OnePlus 5 expected to feature a higher resolution display, larger battery, and improved
specs, chances are the price will jump up yet
again.
A sketchy listing pegged the price at $450, which may be closer to the final price than
you think.
When you consider the Galaxy S8 is said to cost roughly $310, it starts to make sense.
$450 is not cheap, but it�s still a lot more affordable than
its biggest competitors, which is the most important thing.
Oneplus 5 Rumors and Myths BUSTED Lets get Oneplus 5 Specs Right
oneplus 5 | oneplus 5 review | oneplus | oneplus 5 unboxing | oneplus 5 specs | oneplus 5 release
date | oneplus 5 rumors | oneplus 5 camera |
oneplus 5 price | oneplus 5 hindi | oneplus 5 2017 | oneplus 5 leaks | oneplus 5 concept
| oneplus 5 edge | oneplus 4 | oneplus 3t | oneplus 5 official |
oneplus 5 release date india | oneplus 5 price in india |
oneplus 5t | oneplus 5 india | oneplus 5x | oneplus 5 phone | oneplus 5 first look |
oneplus 5 hands on
-------------------------------------------
SOURDOUGH STARTER STORAGE - How to Dry a Sourdough Starter - Duration: 4:03.
Now if you've joined me on the series about making a sourdough starter, you've got the
beautiful sourdough starter.
Now what are you going to do with it, well if you're baking regularly just keep it on
the side feed it each day, make your bread.
If you're only making sourdough every week or so then pop this into the fridge and chill
it, that will stop the yeast from developing and when you're ready to use it just remember
to bring it out three or four hours before.
Bring it up to room temperature, take about half a cup of the sourdough mixture out and
then feed back into it, equal quantities of water and flour, up to about again half a
cup and you will see within a few hours all the yeast will come back to life and you can
store this pretty much indefinitely.
You will have heard people keeping sourdough starters for many tens of years I believe
even 50 60 years plus but here's a dilemma maybe you just want to stop making sourdough
for six months or so and you don't want to look after it in the fridge or if like me
you've made this beautiful sourdough starter and I'm moving from Sicily, we've only been
here for a short while and going to a completely new location, is it possible to take this
with you?
I'll show you the best way to do that.
We're going to dry this sourdough out just like you would dried yeast.
Get yourself a nice sheet of baking paper and then we're going to take this beautiful
Airy sourdough starter and we're just going to spoon it onto the parchment paper, or baking
paper and then I've got a little crank handled spatula here and we're just going to push
this out, nice and flat so you
spread your sourdough out nice and thin
and evenly across some parchment like
this. Now it very much depends on the
environment you're in, the temperature,
the time of year but this can take
anywhere from one to maybe even three
days. When it's completely dry I'll show
you what we do with it. So you can see my
yeast dried out, it took about a day and
a half where I am but it's crisp as crisp can
be. So how are we going to store this? For
me I'm just going to take these bits of
dried yeast and I'm going to break them
up into a bowl, you can see it's almost,
it's almost like a cornflake consistency.
It's super dehydrated but the yeast is
still alive in this dried mixture. I'm
just going to crush it up a little bit
finer. Now because we are traveling in
Sicily at the moment I haven't got all
my kitchen equipment, I would probably
process this down to a fine powder or
use a mortar and pestle to make it to a
fine powder but it's not necessary, it's
just as simple to keep it like this in
the flakes and I'm going to store it in
a ziplock bag. So I just zip that closed
and that is it, there is my yeast I can
store it for many months, years even in
this dry form and you can take it with
you to another destination. Now I hope a
lot of you have found this useful,
if you want to rehydrate this by the way,
you can just add it back to water, start
feeding it again but I am thinking of
doing a video sometime in the future,
whether it's here in Sicily or maybe in
a different part of the world even, where
I'm going to use this yeast and
rehydrate it, just to explain to you how
simple it is. So look out for that video, I hope
you've enjoyed the bread series that
we're doing here on Steve's kitchen. Be
good,
I'll leave a link to the whole bread
series at the end of the video, take care,
share the love, give this the thumbs up
and I will see you in the next video
-------------------------------------------
►LE MONTAGE D'UNE VIDÉO SOSHARUPRODUCTION◄ - Duration: 7:58. For more infomation >> ►LE MONTAGE D'UNE VIDÉO SOSHARUPRODUCTION◄ - Duration: 7:58.
 -------------------------------------------
LIVRES & ÉDITION : Le droit d'auteur - L'ÉDITION 5 - L'ARCHE - Duration: 4:22. For more infomation >> LIVRES & ÉDITION : Le droit d'auteur - L'ÉDITION 5 - L'ARCHE - Duration: 4:22.
 -------------------------------------------
Seite an Seite I Bianca J. Wilke I Original: Christina Stürmer - Duration: 3:28. For more infomation >> Seite an Seite I Bianca J. Wilke I Original: Christina Stürmer - Duration: 3:28.
 -------------------------------------------
Outlast 2 | 絕命精神病院2 | #6 - Duration: 19:55.Outlast 2
No comments:
Post a Comment