Hi, in this active captain video we'll show you how to start up
and pair your active captain mobile app with your Garmin marine device.
Before we get started there are three important things you need to be aware of
before you get to your boat and try to connect or use the Active captain app.
First in order to pair with the app you need to make sure your chartplotter
or combo has the most current version of software.
You'll download the latest update available onto an SD™ card.
We recommend a class 10 SD card with capacity of 32GB or less.
To perform the upgrade, go to garmin.com
then 'Products'
and download the software bundle for your chartplotter.
Scroll down to 'Marine'.
Select 'Chartplotters & Combos' from the pull-down menu.
Scroll to the bottom of the page and from the list on the left select, 'Software Updates'
and download the software bundle for your chartplotter.
Once on board your boat, insert this card into your marine device
and then install the software updates.
This will become your dedicated ActiveCaptain SD card
and will remain installed in your marine device.
It will provide the extra memory to run some of the big data transfers
you can do using the ActiveCaptain app.
And third, download the ActiveCaptain app to your mobile device and sign in.
Now, let's configure the built-in Wi-Fi on your marine device.
If you haven't already, turn on your marine device.
Select 'Settings',
select 'Communications',
and then select 'Wi-Fi Network'.
This enables the Wi-Fi to create a wireless network
that your mobile device can join.
Press 'OK' to configure the Wi-Fi connection for the first time.
Now you'll be asked to type in a name for your Wi-Fi network.
When you have entered the name, select 'Done'.
Now, you'll need to create a password for your Wi-Fi network.
After you have entered the password, make sure to write it down and save it.
Once you have finished, select 'Done'.
Your Wi-Fi network is now configured and ready for use.
To connect to ActiveCaptain, return to the home screen
and select the 'ActiveCaptain' button.
On ECHOMAP and STRIKER units, it is located right on the home screen.
On GPSMAP units, you'll first need to select 'A/V Gauges, Controls'
and it will appear on the next screen.
Now, in the ActiveCaptain App on your mobile device,
select 'Connect to Chartplotter' at the bottom of the screen.
Select 'Yes' since you configured and turned on your Wi-Fi in an earlier step.
Next, go into your Wi-Fi settings on your phone.
Select the Wi-Fi network for your marine device
and enter the password when prompted.
If you have an Android mobile device,
a screen may appear indicating the marine device's Wi-Fi
does not enable internet connectivity.
Select the prompt.
Another screen will appear repeating that this network has no internet access.
Select the checkbox and then 'Yes'.
You must do this for the app to function properly.
The "Connect to Chartplotter" screen will appear again and this time, select 'Continue'.
At this point, the app will connect to the Wi-Fi network for your marine device.
This screen may show for several seconds.
As the app is connecting, the user will be prompted to answer
whether he or she is the "owner" of the vessel.
This is a very important point in the process.
The owner of the vessel has the right to register all the Garmin electronics
to his or her Garmin account.
By doing so, the built-in charts and accessory map cards
will also be registered to the owner's account.
NOTE: This latter part concerning charts and accessory map cards cannot be undone.
Once maps are associated with an owner, they cannot move between accounts.
The owner role also gives permissions to use other features
such as auto User Data Sync with GPSMAP products
and upload Quickdraw Contours surveys to the Quickdraw Community.
If the user is the owner of the vessel, he or she should select 'Yes' at the prompt
and then 'Done' on the full screen immediately following.
Once connected, the app will ask you to create a dedicated ActiveCaptain SD card.
NOTE: this only applies to ECHOMAP and GPSMAP devices.
STRIKERS have built-in memory to store ActiveCaptain data.
Steps to create ActiveCaptain SD card.
From the ActiveCaptain menu, select 'Set ActiveCaptain Card'.
Now, 'Select Card'.
Press 'Select' to choose the correct memory card slot
Your ActiveCaptain Memory card will be created.
Then your ActiveCaptain status menu will display.
Congratulations. You are now an ActiveCaptain.
Learn more about using the ActiveCaptain app
and other Garmin marine products for your boat at garmin.com
 For more infomation >> 'OT 2017': El desafortunado gesto de Agoney y Nerea que no ha gustado a la audiencia - Duration: 2:07.
  For more infomation >> Upplication: Plataforma para crear fácilmente la app de tu negocio (Hosting acens) - Duration: 2:56.
  For more infomation >> 이훈 헬스장 월세만 100억! 온몸으로 인생의 쓴맛을 받아낸 남자 - Duration: 8:32.

 For more infomation >> Bolsas personalizadas baratas #18 Bolsa de algodón con asas cortas - Duration: 0:39.
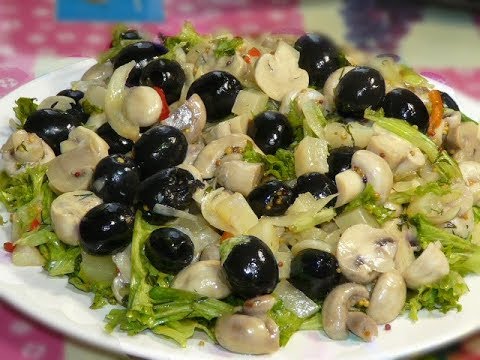 For more infomation >> DELICIOUS SALAD FOR THE NEW YEAR 2018 - Duration: 1:19.
 For more infomation >> Fascistas, franquistas y seres repugnantes en Cataluña - Duration: 7:55.
  For more infomation >> How To Get BOTH Versions o...
 For more infomation >> 大雄環境設定教學 - Duration: 7:50.
 For more infomation >> 当時の製造方法で蘇ると言われたACコブラ追加情報。エンジンはV8/6.2L、出力は最高で550馬力 - Duration: 1:46.
 For more infomation >> Tonon a Pomeriggio 5 parla dell'ex fidanzata: "Non è stata una storia finta" | Wind Zuiden - Duration: 2:50.
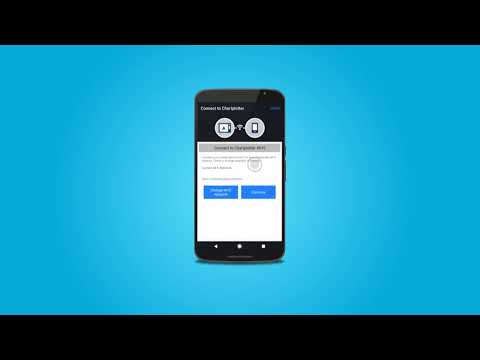
 For more infomation >> 축구선수 이민아, 이 미모 실화?…역시 '축구계 김태희' - Duration: 3:39.
  For more infomation >> Uomini e Donne, Sara e Nilufar: il gesto della redazione fa arrabbiare i fan | Wind Zuiden - Duration: 2:48.
  For more infomation >> 【Undertale 音樂翻譯】強者 Stronger [中文CC字幕](By Whec 227) - Duration: 3:20.
 For more infomation >> Rođendanska pesma | Srećan rođendan Cveto | Birthday Song | Pevaj sa Sandrom - Duration: 2:10.
  For more infomation >> Rođendanska pesma | Srećan rođendan Dragana | Pevaj sa Sandrom - Duration: 2:09.
  For more infomation >> I CANT COMPLETE THIS LEVEL!! - roblox- - Duration: 8:13.
  For more infomation >> How to Grow Long Eyelashes Fast : Natural Home Remedies - Duration: 7:06.
  For more infomation >> Gossip Belen Rodriguez si è rifatta il sedere? Ecco i sospetti e le prove | M.C.G.S - Duration: 3:42.
  For more infomation >> Vlog: How I Renewed My LTO Car Registration - Duration: 4:45.
  For more infomation >> Hyundai ix20 1.4i i-Vision + schuifkanteldak - Duration: 0:57.
  For more infomation >> Hyundai i20 1.2i i-Deal - Duration: 1:00.
  For more infomation >> 北, 탈북작가에 축전 보낸 李 대통령 '역도' 비난 - Duration: 3:02.
  For more infomation >> "Lavoro per difendere i Kawahiva incontattati" - Duration: 2:12.
  For more infomation >> Hyundai i20 1.2i Go! Plus + Schuifkanteldak - Duration: 1:00.
  For more infomation >> Hyundai i10 1.2 i-Motion Cool + Airco - Duration: 1:00.
 For more infomation >> Hyundai i20 1.2 HP i-Motion Comfort Nieuw Model - Duration: 1:01.
  For more infomation >> Toyota Aygo 1.0 12v VVT-i Now (Airco/5drs.) - Duration: 0:55.

 For more infomation >> [ANNOUNCEMENT] - Duration: 3:00.
  For more infomation >> 가수 비 정지훈♥ 김태희! 딸 - Duration: 11:33.
  For more infomation >> 김태원 부인 아들 자폐아 딸 작곡한 노래 크리스 레오네 - Duration: 5:52.

 For more infomation >> 뭉쳐야 뜬다 비, 김태희와 결혼 후 연예계 부동산 재벌 1위로 재산 순위 급등한 이유? - Duration: 7:43.

 For more infomation >> Valorize a Conexão - UK - Duration: 2:24.
  For more infomation >> Valorize a Conexão - Taiwan - Duration: 2:59.
  For more infomation >> Valorize a Conexão - Filipinas - Duration: 2:13.
  For more infomation >> As Melhores Música Gospel (Atualizado) 2017 -12 Hinos que vão te emocionar e edificar sua fé em 2017 - Duration: 1:00:55.
  For more infomation >> Meu Álbum de Memórias - Duration: 3:35.
  For more infomation >> Valorize a Conexão - Japão - Duration: 2:07.
  For more infomation >> Valorize a Conexão - Índia - Duration: 2:08.
  For more infomation >> Jim Yosef - Courage _ Link _ Speed(Gái xinh thổ dân _ NCS release music) - Duration: 11:10.
  For more infomation >> Valorize a Conexão - França - Duration: 2:23.
  For more infomation >> Valorize a Conexão - Nova Zelândia - Duration: 2:14.
No comments:
Post a Comment