Hey guys. Welcome back to my channel.
For those of you who are new, my name is
Tamia. And I thank you guys for joining.
Today, I'm going to show you how I got
this coppery look with this bun.
I'm actually going to show you how I achieve
this bun. It's a quick- very quick, 10 minutes or less look for the hair
and then of
course the makeup.
I'm gonna give you some glow some dew.
I used about three of Smashbox's primers.
I used the Primer Water, I used the Primer Oil and I also
use the Photo Edit- photo edit or Photo Finish light.
It blurs and smooths out your skin.
So I will keep you updated as to how
this baby- how it turns out. But so far I'm liking it.
I have like fresh face,
fresh glow
so
I will take it.
So I have not put any primers or oils or anything
on my face.
Lately I've been doing a turmeric and ginger mask.
Maybe three
times this week already and I'm loving
the way that my skin is glowing.
As you see, I only washed my face today
I haven't done anything else to it.
No oils, no moisturizers
and this is the result.
So it still have a bit of shine and sheen and glow
which I love.
It's a very natural way to
get your skin glowing.
But for now I'm
gonna start with a bunch of these Smashbox
primers to show you guys how
those can illuminate your skin and help with your
application of your makeup.
I'm gonna start with a Primer Water.
And with this I'm just gonna spritz it on my face.
It smells really good!
Now I'm going to go in with a little Primer Oil.
This is their Photo Finish Primer Oil.
I usually use oil within my skincare. But today I wanted
to try out what Smashbox has.
And it comes in this little dropper. So I'm just going to
drop a few drops
like so.
This is a little more thick than the Wild Rose Oil by
Korres that I use on a daily basis.
But we will see how this turns out.
Then for my final primer-
this has become a three-step process, but the final primer
that I'm going to use is their
Photo Finish
Super Light.
I've been using this
I love it! This is just new packaging.
And it's great for taking photos which
obviously I do that.
I'm going to do a little of that.
This will help
blur out any fine lines
and give us a smooth application.
So that is it for my primers.
I'm going to go in now with my foundation.
And today I'm using Anastasia's Stick
Foundation in Chestnut.
My Beauty Blender.
-my wet Beauty Blender and blend this baby out.
I'm going to start at my forehead cause
-cause I've said many times I don't like
for too much makeup to be around my forehead.
But again I love when I use
a Beauty Blender it just-
it makes my foundation seem like it's just a second skin.
And it's a flawless application so,
as I said before this is my go-to now.
Cream Contour here in here by Anastasia.
I'm actually just placing it
so that I can go in with my beauty blender and blend this out.
It's a lot.
My forehead naturally tans so much darker than the rest
of my skin.
Probably because it's SO BIG!
But because of that to keep in continuity, I do not put any foundation
up there.
Blend this right on in into my skin.
Again I love the Beauty Blender for this
because look at that- it's way better than what my brush
would have done.
It just would have let it sit there and this I feel
like just lets it seep right
on into my skin and I just do this little stippling motion.
Oh and a little fun fact-
as I say stippling little fun fact I was actually an art major
in college.
We had to do live models, we had to do
location, paintings and pointillism.
Today I'm going to use
Studio Finish Concealer by MAC.
I haven't used it in a while, but obviously it's
all the way down.
This is NC45.
And I'm just gonna use my finger to apply.
Again I'm just sticking with a more natural application
of my foundation-
all of my base should I say.
And I feel using my finger
gives me the best version of that.
And to be honest, when I'm just trying to get out of the house
quickly
this is
how I do it.
I literally use my finger- tap, tap, tap
and keep it moving.
Like I said, it just gives you a second
skin and you can already see the glow through
what I've already done.
Cause as much as I don't want to matte this out
I have oily skin and I don't know how
the primer oil is going to affect me later in the day so I
want to make sure
I go through and use a little powder.
Again, I'm going to go back in with this
and make sure everything is
well blended in.
It's looking good.
Blot Pressed Powder from MAC.
My color is dark.
This little guy who gets in there.
And I'm just gonna take it like so.
This is- I'm gonna go in under my eyes with this one.
So I'm just gonna pat it
just to get it matte.
And you can see, it's definitely matting
out my face right now
but
the excitement comes in to
how the glow will seep through
what I'm doing.
I just need to matte it out a little cause I know
it's going-It's bound to happen.
I just don't need it to be like that right now
cause I already have oily skin.
So for the rest I'm actually gonna take a brush
cause I don't want it to look too crazy up there.
I'm gonna mix number two and three.
That's what I'ma do.
Then take it right on up to the top.
I'm gonna go in here on my BH Cosmetics nude palette.
Smile a little.
Starting from the outside.
Just having this conversation with my sister I was
looking at old photos
and my brows man - used to be like!?!
Now I do them a little
more of natural everyday kind of look.
But I was looking at some photos like-
they used to be crispy!!!
What happened?!?
My preferences changed!
Time will do that.
I'm going with Maybelline Master Chrome.
And this is Molten Gold
I don't know if you were ready for that one.
But see- do you see - this is the glow the illumination
that the Smashbox- all the
the variation of the three primers that I've used,
this is the result. I haven't put
any highlighter on this side yet, but this is the glow that's
happening which is why I blotted my face.
But if you see like- that right there it's pretty good.
Now this is like once I've added highlighter
obviously.
Took it to the next level, but this side like if I was just to
go out like this
I would be ok with that.
But we're gonna add some highlight.
Are we ever....this Molten Gold man-
look at that!
Look at that!
This glow- this is why I like to do my face before
I do anything else
because legit
if once I do this and I'm feeling it and I'm okay with like
with it how bare it looks around my eyes
I'll just do my eyebrows
throw on some mascara and
out the door.
But every day is different and today I have a treat for you guys
because my friends at Hank and Henry...
There's three different colors in here
obviously the top two
and those are the shadows.
It starts with Lady Soho and
then a Grundge Kid.
And the lights and for the glitter
we have
New York Nights.
I don't know if you can see that New York Nights.
So I'm gonna use that in combination with
Si Se Puede.
Which is from another a previous one they sent me. And I don't know if you can see it
This is Si Se Puede.
Also from Hank and Henry I've never used it so we will
combine these two today
and hopefully come out with something pretty great!
24-hour Shadow Insurance by TooFaced.
Just a little bit.
Just a little bit.
Again,
do not mind my
flyaways.
I will show you how to get this miraculous bun.
Dose of Colors.
Guys, don't be alarmed I'm literally just placing this so
that I can go in and
blend it out. I know it looks a little scary right now
see now I'm starting to question whether or not I want to
wear this New Lady (York) Lights
or if I want to go in with Si Se Puede and I think I want the Si Se Puede.
Let's see. I'm gonna swatch them both and
then I'll determine
because the
New York lights looks a little like what I- what I do often. Like that orangey
coraly- I mean yeah orangey coppery kind of tone
and this just gives me like gold vibes.
So I feel like I just want the gold vibes, you know.
It's just the regular Naked palette.
And I need to put a neutral color on my lid so I'm gonna
go in with this Naked color right here.
Get that brush wet.
And then I just
Ooooh, yeah! I think we went with the right decision.
I think this was actually the best choice.
Now I'm gonna go in and freshen up my brows
Gonna use this Spiked pencil.
Usually if this was like a regular day
I would not be putting lashes on
simply because I love with this looks like.
It's super like super great.
But I'm gonna put on some lashes for you guys.
And this is a 810 lash by Ardell.
It's in their Faux Mink collection.
Keeping it in the metallic family- the shimmer, the shine
we are using Smashbox Always On.
We have two
metallics one is Bold Digger, this is Bold Digger.
I'm gonna add this
to the center of my lip.
the XO Vlada.
This is my makeup look.
Glouie- glouie, glouie ..Haha glowy and dewy.
Stay tuned because I'm going to show you how to do this bun!
Okay guys so as promised I am going to show you
how I get the marvelous bun.
For starters let me show you the products that I use.
I use the Mane Choice
edge control
well
it's not called edge control,
but the Mane Choice.
I use Murray's Pomade.
Use Simplicity Hair Oil.
I have three bobby pins, hair tie and a brush.
So,
let's take these flyaways down.
I like it to be a little messy which is also a contrived
look but whatever.
I'm taking about this much of the pomade.
And just
right along my edge line.
This is the Murray's by the way- in the orange can
I'm taking it right along my edges.
Then I take the remainder of that add a little more in my hands and
I take it along the rest of my hair
just to ensure- it's a wax so it's not
going to change the texture of your hair if your hair is actually curly there's
no water in it so it's not going to make your hair crinkle up or curl up or any of
that which is why I love it.
So then just go in
brush your edges up
brush them all up
And what I love is that this gives you automatic face lift
So yeah, I'm just gonna
leave like these little hairs down.
Now I'm going to take a little of the edge
control and when I say a little very little because
this tends to
cause my
hair to revert back to its natural state therefore I use both this and
the
pomade.
So I put this on and directly over it I've been a little more pomade.
But in doing
any of this you just use it vary a little bit
because if not too much
product will cause your hair to revert back if your hair is natural like mine.
And again I do this and then I slap on a
head wrap
just to ensure my edges lay.
Bur today, I'm not going to do that.
I don't want any lumps in my pony tail.
So then, you find your desired height.
This is my
desired height.
I'm going to wrap around three times.
Probably could wrap around another, but I don't want to
create
yeah see this I could wrap around another time if I wanted, but I don't
like my ponytails to be too tight because
that's where you get a little breakage and
I don't have time for that!
I literally take it
and lightly twist it around
like so.
This is already the makings of your bun right.
This is already the makings
of your bun.
I just wrap it all the way around
And here I have the perfect
shape right
so depending on how big I want my bun
is how much I spread it out before I
start pinning.
I'm gonna take a hair pin
and pin down.
and I have short hairs in there too so
I am going to
spread
and pin.
Repeat and continue
along the bun.
And like I said, I like my hair a little messy
it doesn't have to be perfect.
So if there's pieces that are sticking out
I'm okay with that.
So I just spread a little more
and pin.
And guys that's my bun.
The SHO oil.
So the oil
That I haven't used yet-
it comes in a dropper.
and just go like this
and do a few drops
it smells so good and refreshing
I just really put it on my edges
to also to focus on shine
and it also helps with my hair growth.
Viola guys!
This is my bun.
This is- take a little wax-
wax down
these bad boys.
If you want baby hair you can do that
I literally- this is all I do
depending on
how I want them but
that's it for me.
Nothing too fancy.
Nothing not too fancy.
This is my bun. This is the look guys.
So, I thank you guys for watching I hope you enjoyed
this video.
If you have any
comments or any questions regarding this look,
any future looks you wish to see
then just drop a comment in the box below.
Again I will have a product list for you
for what I used on my hair as well as my makeup.
And I will see you
guys next time.
 For more infomation >> Qué hacían Diego y Rocío mientras Dalma se casaba por con Andrés - Duration: 2:22.
  For more infomation >> ¡EN VIVO! Daniel Bisogno rompe el silencio y habla sobre la salida de Atala Sarmiento - Duration: 2:32.
  For more infomation >> Padres sobreprotectores vs. liberales: cuál es el mejor estilo de crianza - Duration: 4:09.
  For more infomation >> Cómo combatir la inflamación y gases intestinales con aloe vera y papaya. - Duration: 7:27.
  For more infomation >> Se apagan las alarmas: Messi, al cien por cien ante la Roma - Duration: 3:04.
 For more infomation >> Charlène de Monaco a-t-elle pris ses distances avec les autres membres de la famille princière ? - Duration: 1:31.
 For more infomation >> ChuChu TV Baby Shark ABC ...
 For more infomation >> Super Smash Bros Switch : Ice Climbers y un Nuevo Modo Filtrados? / A Quien Quieren ver en el Juego? - Duration: 4:32.


 For more infomation >> 农历可以从出生日看你【命中注定】的另一半! - Duration: 14:01.
  For more infomation >> Anticipazioni L'Isola dei famosi, squalifica choc e doppia eliminazione? | Wind Zuiden - Duration: 3:32.
 For more infomation >> Opel Astra 1.0 Turbo 105pk Automaat 1e eigenaar Innovation - Duration: 0:54.
  For more infomation >> L'Isola dei famosi, Franco ha lasciato il reality: ecco cos'è successo | Wind Zuiden - Duration: 3:39.
  For more infomation >> Gossip Uomini e donne, Lorenzo nei guai con Sara: segnalazione sul tradimento | Wind Zuiden - Duration: 3:30.
 For more infomation >> Volkswagen Polo 1.2 TSI 90PK 5drs BMT Comfortline Executive Plus | navigatie - Duration: 0:54.
  For more infomation >> Audi A4 2.0 TFSI ultra 190pk S tronic Sport | Navigatie | Cruise Control - Duration: 0:59.
  For more infomation >> Volkswagen Transporter 2.0 TDI KOMBI 62KW 11.950 is ex btw/bpm - Duration: 0:57.
  For more infomation >> Volkswagen up! 1.0 60PK 5-DRS Airco Move Up! - Duration: 1:02.
  For more infomation >> Buy Best Quality Watch | cheap watch price in bd | watch shop in dhaka 2018/Shapon khan vlogs - Duration: 4:21.
  For more infomation >> Volkswagen up! 1.0 44KW/60PK 5-DRS Move Up! Airco Navi - Duration: 0:57.
  For more infomation >> I pericoli del grasso addominale per le donne: come combatterlo? - Duration: 7:22.


 For more infomation >> 'Ursula ha dormito in stanza con i miei figli', Chiara infuriata per le rivelazioni intime | M.C.G.S - Duration: 4:54.
 For more infomation >> ♯ Tony x Steve | 𝑴𝒂𝒚𝒃𝒆 𝑰 𝒅𝒐𝒏'𝒕 𝒘𝒂𝒏𝒕 𝒉𝒆𝒂𝒗𝒆𝒏? - Duration: 1:45.
 For more infomation >> Bitcoin Q&A Czy rzady przejmą kantory i giełdy kryptowalut? [PL] - Duration: 6:11.
  For more infomation >> Hyundai i10 1.0i Comfort Clima/Cruise - Duration: 1:01.
 For more infomation >> Hyundai ix35 2.0i 4WD Navigatie/Cruise/Trekhaak - Duration: 0:54.
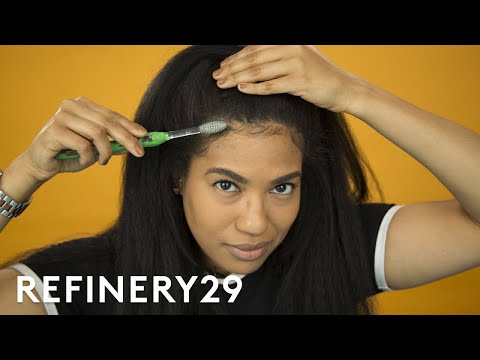
 For more infomation >> Hyundai Atos 1.1i Active Young /Rijklaarprijs - Duration: 1:00.
 For more infomation >> Speak English Fluently | Pronunciation – the word THEM | Pronunciation Guide - Duration: 9:23.


 For more infomation >> O DESAFIO MAIS DIFÍCIL DO YOUTUBE ! (CENAS FORTES) | VEDA #03 - Duration: 4:58.
  For more infomation >> The Voice Kids: Globo admite erro e altera o fim do programa | Noticias Nuevas - Duration: 4:51.
  For more infomation >> Xenofobia no BBB 18? Wagner diz que é o fim do mundo um gringo ganhar o reality | VENTO GRANDE - Duration: 3:52.
  For more infomation >> Ana Clara detona o próprio pai por gostar de Kaysar no BBB18 - Duration: 4:47.
  For more infomation >> L'Isola dei famosi 2018: Franco ha abbandonato l'Honduras, ritiro o squalifica? | Wind Zuiden - Duration: 4:06.
  For more infomation >> Nós temos que atribuir um sentido a vida? - Duration: 1:26.
  For more infomation >> 다크서클에 좋은 음식 or 마사지 알아보는 시간 ^o^;;♥DBH ENT ♥ - Duration: 7:37.
  For more infomation >> Expositor de campeones: Irelia | Experiencia de juego - League of Legends - Duration: 4:33.
  For more infomation >> Suicídio impugnado: ator querido é alvo de terrível notícia |Entretenimento Plus - Duration: 5:05.
 For more infomation >> Cómo hacer Galletas de avena con chocolate sin huevo, sin gluten y sin lácteos - Duration: 6:20.
  For more infomation >> 5 Powerful SEO Keyword Research Tips to Rank on Google in 2018 - Duration: 6:32.
No comments:
Post a Comment