what's up everyone so today's project is completely foreign to me I've actually
never changed out steering stem bearing x' or even the steering stem races on a
frame before so join me as I learned through the process of it all and make
sure you hang in there I've got something really cool for you about
halfway through the video just a quick little overview of what I'll be doing so
the top bearing slides right off but the bottom bearing is pressed onto the stem
and I'm going to show you how you can remove that using no special tools and
then over here on the frame the races are pressed in as well and I'll be using
a race remover to pop those out however it is possible to use a punch or a
socket extension to remove them this frame is freaking sexy by the way to see
the video of me shining it up just click the little circle right up here in the
corner so I've got the nuts in the upper bearing off the stem already and my plan
for removing the lower bearing is to cut the outer shell of the bearing where the
needle sit and that should expose a nice lip to get a grasp with a punch and
knock the inner race off the stem no I've never tried this before but it
should be fun figuring it out I'm gonna pop this thing in the vise so it's a
little easier to work on all right I've got a set of side cutters here and
hopefully that cuts through the bearing and remember safety first guys I've got
it cut through the top part of the bearing just need to make one more snip
here at the bottom
looks like I've got to cut through both sides of bearing now for the fun part
this is just browse open for there's a nice fat lip here on the race to get
ahold of with a punch
I've just got a flat punch and a hammer and I should be able to knock this thing
right off so I guess another way of removing this bearing would be to use
the same punch but wedge it in between the triple clamp
and the bearing but I would rather not troop the triple clamp in the process of
course as the race is coming off you want to be as even as possible so I move
from one side to the other to the top just however whatever it takes do you
get it off evenly as you can see the race ended up chipping in a few spots so
I'm going to move to the bottom of the race and use the seal as the protector
for the triple clamp
so that actually worked out pretty good I ended up with a little nick in the
triple clamp though it should be able to fix that pretty easily all right I am
all ready to install these new bearings and races so the triple clamp might look
a little bit different I ended up sarah coding it if you haven't seen that video
it is absolutely epic just click the circle right up here in the corner for
bearings I've got this pivot work set it's got both bearings both races and
all the seals required and then here are the tools necessary to do the job this
is a steering stem bearing installer kit and then over here is a very press so
everything necessary to do the job all this was supplied by rocky mountain so
huge huge shout out to them before I get started let's take a second and pick the
winner for the giveaway of this master cylinder cap you guys crushed it on this
one 1,500 comments that's insane all right so it's generator it's gonna pick
a complete random comment from that video and you will be the winner who we
got beta KTM rider it says both two-stroke and four-stroke love your
vids alright man or woman whoever you are should be a message here on YouTube
with your shipping address and I will get this master cylinder cap over to you
Congrats the first step of course is to make sure I've got everything necessary
as far as parts go I've got the two seals got a bearing and a race and
another bearing and a race oh and of course you can't forget the grease so
I'm looking at these bearings they both got the same part number on this
particular bike no need to worry about differentiating the top from the bottom
and before I get started with assembling anything I'm gonna pack these bearings
full of grease
now the goal here with packing the bearings is the have grease pouring out
of each individual needle and in between the inner and outer race as well and how
I'm going to go about this is by squirting grease on the outside of the
bearing here or you can just put grease in the palm of your hand and we're gonna
work it all into the bearing I'm just gonna go for both here grease in the
palm and grease on the bearing so I've got my fingers jammed inside the bearing
here and I'm just gonna work the grease all
into the bearing until we have grease pouring out of every part of the bearing
thing I like about pivot works is they provide you with red grease which of
course as you guys know is my favorite color remember all that grease I'd put
on the bearing and in my palm now somehow packed inside that bearing you
can see there's grease coming out between the two races and as I'm
spinning the bearing here the rollers are thoroughly coated and just for good
measure I'm gonna put a little bit more on top now I'm just gonna follow the
same exact process on this other bearing pretty straightforward all right the
lower bearing is ready to be pressed onto the triple clamp now and of course
it would be a disaster if you forgot the seal that goes underneath the bearing so
we've got two seals here one with a thinner lip and one with a fatter lip so
the one with the thinner lip goes over the stem and underneath the lower
bearing just like that with the lip facing up and just to help the cause I'm
gonna put a little bit of grease on the stem
since these bearings are both the same won't really matter which one goes on
first just got to make sure the taper is facing up
and right there as the farthest I can get it down by hand now this is where
the Tusk steering stem bearing installer comes in handy got a few different size
adapters here just gonna size it up and figure out which one is correct all
right looks like the green one doesn't fit down onto the stem try out the red
one that should be it so you want the installer tool to be pressing on the
inner race of the bearing the inner race is the inner part you see on the bearing
right there so looks like this one's good to go now I'll need to size up the
stem with a socket by putting a socket underneath the triple clamp on the stem
here that will ensure the stem doesn't move at all during this process looks
like I've got the correct one right there 24 millimeter just gonna place the
socket underneath the triple clamp and I'll be ready to press this bearing into
place and this is the tool that slides over the stem and makes contact with
that red adapter it is pretty straightforward just hammering on the
end of the shaft here and making sure the bearing is going on straight
I've just about got the bearing seated and when I get to the bottom it'll make
a different sound so at that point time to stop you can hear it right there more
of a solid sound to it like I said earlier this is actually my
first time ever installing a new lower bearing and however this tool it made it
super easy it kind of centers itself or locates itself on the stem and then
you've got the adapter which fits perfectly with the bearing so no need to
worry about damaging the bearing or putting it on crooked and so far the
center coating on the triple clamp is holding up awesome I expected to see a
little bit of silver showing through from being in contact with a socket but
I don't see any damage whatsoever with the bottom bearing installed it is time
to pop in these new bearing races but first I'll need to remove the old ones
so I've got the frame all bolted down to the stand here and I guess that means
the bike is starting to go back together alright to remove these old bearing
races I'll just be using a hammer along with a long 3/8 inch extension and of
course as you're whacking on this thing you want to make sure you're working it
out evenly go from one side to the other
now if you're having trouble with removing the old races I would recommend
heating up the area with a propane torch that will help out quite a bit I'm
taking a look at these old races here and they seem to be in pretty good shape
I don't see any pitting on them but nonetheless it's a good idea to replace
them alongside the new bearings before the new races go in I'm just gonna clean
up the frame with some brake cleaner and a rag here and it never hurts to apply
some grease before installation on this bike both races are the same so it
doesn't matter which one goes where it is time to bust out the bearing press
just gonna figure out which adapter I need here looks like that one fits
pretty snug in there also supplied in the kit is this handle to get the
bearing race started and straight
looks like the race is going in pretty straight it's gonna get this call it
back into place and now I've got the actual press part of the tool this is
the handle that goes up top and the shaft that slides through the neck of
the frame it's pretty slick the shaft has a quick
release button to adjust the depth and now I'm gonna slide the shaft through
the neck of the frame and install the handle up top I'll need to move this
thing up a few notches right about there looks good whether you're pressing in
the top race or the bottom race you always want to have the handle on top of
the frame it's making sure I got everything all lined up here and so
tightening down the handle will press that race down inside the frame
as the race is being pressed in you should be able to feel when it bottoms
out and it's definitely important to have that race seated all the way
and then pressing the quick release on the bottom will release this whole
assembly from the frame like I said earlier it's super important for the
race to be seated all the way in the frame
make sure there's no gap underneath it and if you applied any grease you'll be
able to see it squeezing out once that race is seated all the way now the
process for the bottom race is gonna be slightly different here I've got the
race I'm gonna get it into place and then I've got the handle with the collet
on it just to get things started things are looking good with the race so I'm
gonna pop to call it off the handle and grab the press tools all right what'll
be different this time around is I'll be putting the call it on the bottom side
instead of the top sliding the shaft through the frame with the handle on and
then putting the quick-release on the bottom side and like I said earlier you
always want to have the handle the tool up on top of the frame just got to make
sure I got this quick-release walked into place there it is and then I can
tighten the handle up top
just gonna keep twisting until I feel it bottom out it feels like it stopped
right there so I'm gonna pull this apart and make sure that race is seated all
the way since the bottom race is a little tougher to see I've got a 90
degree pick here just gonna run it up inside and make sure there's no gap all
the way around all right we're all set races are all pressed in man having this
press tool was definitely a lifesaver I don't know if I would have been able to
get these races in straight otherwise what I'm excited about now is installing
these triple clamps and seeing how the bronze goes with the aluminum but before
I slide the triple clamp in gonna dab some more grease onto these races and
bearings
I've always preferred setting up the top bearing seal and the nut that way I'm
not trying to scrounge for parts as the triple clamps already in now it's a
pretty simple deal from here on out
now to tighten down this nut I've got a spanner wrench which will take care of
that since I can't set the steering head tension without the front ompletely
together I'm just gonna tighten down this nut until it's somewhat snug man
those new bearings and fresh grease make it so smooth all right right about there
feels good it's got some tension but it's definitely not loose to the point
where it's sloppy time to top it off with the upper triple
clamp this should look amazing now I'm gonna top it off of the washer and this
trick little anodized nut that I snagged from Rocky Mountain actually before I
throw that nut on I know these threads corrode pretty
easily so I'm gonna use some anti-seize lubricant
just gonna cinch down the nut with a steering stem wrench and just like the
lower nut can't give it a final tighten until the front end is all together
these wrenches are super handy to have it's got a thirty two millimeter on one
side and 30 mil on the other so it'll work on pretty much any bike out there
as well as most rear axles - and I know someone out there could really put one
of these wrenches to use so I'm gonna hook you up all you have to do is
comment down below what your dream motorcycle is it could be anything then
I'm gonna go through and pick one your comments at random and have Rocky
Mountain ship you one of these wrenches good luck everyone
oh man that looks so rad I love the bronze look with the red I cannot wait
to put this bike together some more the next video will be on doing some really
cool things with the brakes so stay tuned you guys know the deal by now all
the parts and tools they use throughout the video are linked down below so that
way you're not on a wild goose chase looking for stuff alright thank you so
much for watching everyone and I will see you around
 For more infomation >> Alicia Machado habla del padre de su hija | Suelta La Sopa | Entretenimiento - Duration: 3:19.
  For more infomation >> Jomari no se quedó callado tras el impasse entre la reina de España y su suegra | GYF - Duration: 1:48.
  For more infomation >> Actores mexicanos con los que Mark Ruffalo trabajaría | Suelta La Sopa | Entretenimiento - Duration: 0:34.
  For more infomation >> Ex novia de Ricky no sabía de su orientación sexual | Suelta La Sopa | Entretenimiento - Duration: 0:43.
  For more infomation >> Invitan a Canelo Álvarez a que se vuelva vegano | Suelta La Sopa | Entretenimiento - Duration: 0:34.
  For more infomation >> Sigue la huelga de maestros en Oklahoma | Al Rojo Vivo | Telemundo - Duration: 0:35.
  For more infomation >> Vientos poderosos arrancaron el techo de una escuela | Al Rojo Vivo | Telemundo - Duration: 0:29.
  For more infomation >> Alejandro de la Madrid habla de la serie José José | Suelta La Sopa | Entretenimiento - Duration: 1:55.
  For more infomation >> Mi Amiga me lo Enseñó y NO TENGO ni Una ARRUGA en mi Cara Después que Usé Esta Mascarilla - Duration: 2:50.
  For more infomation >> Marie-Chantal Miller y doña Letizia, historia de una enemistad nacida en Palma - Duration: 6:04.
 For more infomation >> Caos en supermercado por explosión de dos artefactos | Al Rojo Vivo | Telemundo - Duration: 2:34.
  For more infomation >> Marie-Chantal Miller: la niña díscola y mimada de la casa real griega - Duration: 2:52.
  For more infomation >> El Aterrador CASO DE BETO SALAS CON UNA NIÑA FANTASMA - Duration: 17:46.
  For more infomation >> Smaller - 🤘 Soltando lyrics 🤘 (Oficial Vídeo) - Duration: 3:22.
  For more infomation >> Pierda 4KG En 3 DIAS Con La Dieta De La Piña Que Va Derretir Toda Su Grasa!! - Duration: 3:19.
  For more infomation >> Seven Kayne - Atrapado (Letra) - Duration: 3:36.
  For more infomation >> Combine CHIA com suco de LIMÃO e você terá estes Surpreendentes Benefícios para sua Saúde! - Duration: 3:24.
  For more infomation >> 조중웅이 수 억 원 광고를 거절하자 아내가 말했다.|조회수8.212.910 - Duration: 3:00.
  For more infomation >> 김재욱은 회색 머리카락으로 염색 한 후 치명적인 '퇴폐적 인'|조회수8.212.910 - Duration: 2:43.
  For more infomation >> 소녀 아이돌 9, 선조들로 가득 차서 '병아리 쌀'로 가득 차있다.|조회수8.212.910 - Duration: 5:23.
  For more infomation >> Wykryj raka jelita grubego na czas! - Duration: 9:55.
  For more infomation >> Volkswagen up! 1.0 60pk 3-DRS Move Up! | Executive pakket | Climatic - Duration: 0:42.
  For more infomation >> Volkswagen Beetle 1.4 TSI 160pk Sport Executive | Leder | Keyless | Xenon | - Duration: 0:59.
  For more infomation >> Opel Insignia Business Executive Grand Sport 1.5 Turbo 165pk - Duration: 0:59.
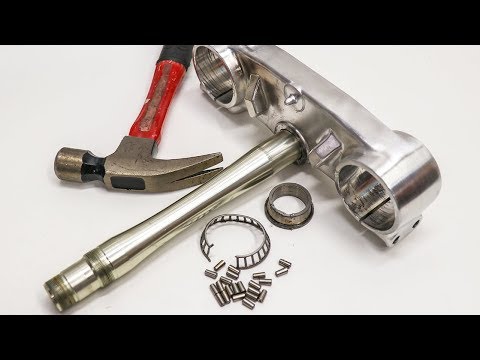
 For more infomation >> 'I Was Furious,' Says Woman Who Claims Her Mother Drove Drunk With Grandkids In The Car - Duration: 5:01.
  For more infomation >> CHEAP vs EXPENSIVE Underwear - I SPENT $1000 💸 (LA PERLA vs MARSHALL'S) | Mar - Duration: 19:02.


 For more infomation >> BMW 3 Serie 316i Executive I Navigatie I Parkeersensoren I Xenon I Aut. Airconditioning - Duration: 0:54.
 For more infomation >> Mazda 323 Fastbreak 2.0i Touring Airco Nwe Distriburie - Duration: 0:51.
  For more infomation >> Honda CR-V 2.0I ELEGANCE AUTOMAAT Navi Ecc Cruise Trekhaak 82DKM! - Duration: 0:55.
  For more infomation >> Hyundai ix20 1.4I I-MOTION - Duration: 0:58.
 For more infomation >> Hyundai Veloster 1.6 GDI i-Catcher - Duration: 0:54.
  For more infomation >> Kia Picanto 1.0i-12V X-Pect 5-Deurs Stuurbekr. ABS Airbags 19.268km! - Duration: 1:00.
  For more infomation >> Toyota Aygo 1.0 VVT-I NOW 5-deurs | Airco | 1e eigenaar | Dealer onderhouden - Duration: 0:54.
  For more infomation >> Toyota Prius 1.5 VVT-I BUSINESS EDITION, Navi, Bluetooth, Cruise - Duration: 0:58.
  For more infomation >> Toyota Yaris 1.0 VVT-I ASPIRATION met parkeercamera - Duration: 1:03.
  For more infomation >> Toyota Yaris 1.0 VVT-I ASPIRATION met navigatie en trekhaak !! - Duration: 0:57.

 For more infomation >> Academy of Art University
 For more infomation >> GRUPO ARCTURIANO - [O AMOR É A COLA QUE UNE TODAS AS COISAS] - Duration: 14:07.
  For more infomation >> CAPITANIAS HEREDITÁRIAS - BRASIL DO CASSETA - Duration: 3:30.
  For more infomation >> ELFOS (EDITORA MYTHOS) - Jujuba ATÔMICA - Duration: 8:01.
  For more infomation >> Mujica sobre o consumismo - Duration: 1:22.
 For more infomation >> Cachorro Fazendo O Trabalho—O Trabalho de Byron Katie - Duration: 1:21.
 For more infomation >> Será que é melhor amaciar seu motor de popa no "PAU" mesmo? - Duration: 3:02.
  For more infomation >> Ex-BBB Lucas pede desculpas para ex-noiva e se declara: "Te amo" - Duration: 3:21.
 For more infomation >> Nightcore - Affections Touching Across Time (To Love's End) [Inuyasha OST] | Lyrics - Duration: 2:04.

 For more infomation >> Ex-BBB Lucas critica "personagem" de Kaysar e surpreende com opinião - Duration: 5:14.
No comments:
Post a Comment