Tuesday, July 25, 2017

Youtube daily report w Jul 25 2017

Mrs Wick! The Female Bond! Jane Bourne!

For more infomation >> Atomic Blonde Movie Review - Duration: 8:15.

-------------------------------------------

РАСТУЩИЙ РОБОТ [Новости науки и технологий] - Duration: 10:13.

For more infomation >> РАСТУЩИЙ РОБОТ [Новости науки и технологий] - Duration: 10:13.

-------------------------------------------

😍 SEXY GIRL TOP 10 MINECRAFT INTRO ANIMATIONS + Music Names by OliverFX - Duration: 10:03.

If You're reading this.... (•◡•)

then you're beautiful and loved

and deserve to be happy :3

I found myself a lot happier lately. thanks for all the supportive comments, it means a lot u guys understand. ❤

Stay tuned in, make sure to click the notification button, because 2017 is going to be a wild ride :') ❤

Guys be sure to share this video because I am currently trying to hit 20k subscribers

▪ Likes & Comments are always appreciated ♥

tell your friends

tell your family

let everyone know about me...

STAY AWESOME!

Thank you all for 18k Subscribers! <3

I hope you continue to support the channel. :D

Anyways, I want to remind you that you are a very special person.

There are many people who love you out there

and you are awesome

Never forget that you have a role in this world

that nobody else could fulfill.

You are unique, and you should be proud of that.

and have a wonderful day. ♥

Thanks to all that subscribe and help out! :3

Thank you all so much for supporting me this far.

I'd never thought that I would grow this fast.

Watching my channel grow faster than my inspirations

it amazes me how much I've gotten better.

I guess dreams really come true.

Join the #NotificationSquad by hitting that notification🔔 button next to Subscribe!

🔔Here's a new TOP Intro Makers. I hope you enjoy this top! :) Let me know which one is your favourite?

★ Let's be friends?😊

Like the video? ☺Share with your friends!❤

thanks for taking the time to watch the video.

If you have questions feel free to ask in the comments i will answer

Remember to share this video with your friends, and stay awesome. Love you all <3

For more infomation >> 😍 SEXY GIRL TOP 10 MINECRAFT INTRO ANIMATIONS + Music Names by OliverFX - Duration: 10:03.

-------------------------------------------

Parda e Bkarat Detail in Urdu | Har Ladki Ye Video Zaroor Daikhay | My Help in Health - Duration: 5:34.

For more infomation >> Parda e Bkarat Detail in Urdu | Har Ladki Ye Video Zaroor Daikhay | My Help in Health - Duration: 5:34.

-------------------------------------------

News Temptation Island, Valeria e Alessio addio: ma lui non molla, il gesto - Duration: 3:12.

For more infomation >> News Temptation Island, Valeria e Alessio addio: ma lui non molla, il gesto - Duration: 3:12.

-------------------------------------------

Peugeot 308 1.6E-HDI 88/120 5-D BLUE LEASE | NAVIGATIE | AIRCO | - Duration: 0:54.

For more infomation >> Peugeot 308 1.6E-HDI 88/120 5-D BLUE LEASE | NAVIGATIE | AIRCO | - Duration: 0:54.

-------------------------------------------

Mercedes-Benz E-Klasse E 220 d Estate AMG Line Automaat Rij-AssistentiePLUS - Duration: 0:41.

For more infomation >> Mercedes-Benz E-Klasse E 220 d Estate AMG Line Automaat Rij-AssistentiePLUS - Duration: 0:41.

-------------------------------------------

Suoni e canto da asta del tonno(Tokyo) "singing tuna rod" - Duration: 1:09.

For more infomation >> Suoni e canto da asta del tonno(Tokyo) "singing tuna rod" - Duration: 1:09.

-------------------------------------------

Mercedes-Benz GLE-Klasse GLE 500 e 4MATIC Automaat| 360 graden camera | Klimaatstoelen | - Duration: 0:54.

For more infomation >> Mercedes-Benz GLE-Klasse GLE 500 e 4MATIC Automaat| 360 graden camera | Klimaatstoelen | - Duration: 0:54.

-------------------------------------------

Peugeot 208 1.4 E-HDI AUT5 ACTIVE 5DRS NAVI AIRCO CR CTRL - Duration: 1:02.

For more infomation >> Peugeot 208 1.4 E-HDI AUT5 ACTIVE 5DRS NAVI AIRCO CR CTRL - Duration: 1:02.

-------------------------------------------

Peugeot 208 1.4 E-HDI AUT5 ACTIVE 5DRS NAVI AIRCO CR CTRL - Duration: 0:57.

For more infomation >> Peugeot 208 1.4 E-HDI AUT5 ACTIVE 5DRS NAVI AIRCO CR CTRL - Duration: 0:57.

-------------------------------------------

Peugeot 208 1.4 E-HDI ACTIVE 5DRS AUTOM PANODAK AIRCO LMV PDC - Duration: 0:58.

For more infomation >> Peugeot 208 1.4 E-HDI ACTIVE 5DRS AUTOM PANODAK AIRCO LMV PDC - Duration: 0:58.

-------------------------------------------

Opel Monza 3.0I GS/E AUTOMATIC, SCHUIF-/KANTELDAK, STUURBEKRACHTIGING, RADIO-CD-MP3-AUX, LM-VELGEN, - Duration: 0:59.

For more infomation >> Opel Monza 3.0I GS/E AUTOMATIC, SCHUIF-/KANTELDAK, STUURBEKRACHTIGING, RADIO-CD-MP3-AUX, LM-VELGEN, - Duration: 0:59.

-------------------------------------------

🌈 UN COLOR ESPECIAL... 🌈 - Duration: 3:19.

ARE YOU HAPPY ?

WHAT ??

ARE YOU HAPPY ?

I AM SUPER HAPPY !!

TRAVELLING

DESIGN

PHOTOGRAPHY

SECOND VLOG

SEVILLE

A SPECIAL COLOR

HEY GUYS !! HOW ARE YOU ? WELCOME AGAIN

TODAY WE'RE GOING TO SEE MORE AMAZING SPOTS OF SEVILLE

THIS WAS OUR SECOND DAY IN THE CITY AND WE ENJOYED IT A LOT

I HAD THE BEST TIME WITH MY FRIEND, SILVIA

WE RENTED SOME BIKES AND VISITED SO MANY PLACES...WE LOVED IT

I'M GOING TO LEAVE YOU GUYS TO THE SECOND VIDEO IN SEVILLE

SO YOU CAN ENJOY NICE VIEWS OF THE CITY, MEET NEW PEOPLE...

AND LEARN MORE ABOUT THE SEVILLIAN CULTURE.

THIS CROWN IS MADE OF " CHINA " (porcelain)

CHINA ??

"MADE IN CHINA"

PORCELAIN !!

SAN PAULO ?

YOU HAD TO SAY IT IN ENGLISH: "SAINT PAUL"

( MILENA ALMOST FALLS DOWN )

Tourist guide - WATCH THE FANCE...

I´M RECORDING EVERYTHING OKAY?

IF I FALL AGAIN...

... WHATEVER

OF COURSE, BETTER BREAK YOUR LEG THAN STOP RECORDING!

WELL GUYS, I HOPE YOU LIKED THIS SECOND VIDEO IN SEVILLE

GIVE IT SOME THUMBS UP!

MAKE SURE TO SUBSCRIBE!

IN THE NEXT VIDEO I´M TAKING YOU TO SOME AMAZING BEACHES IN ANDALUSIA

I WILL NOT SAY WHICH OF THEM BUT, BELIEVE ME, SOME THE BEST BEACHES IN SPAIN!

I´LL SEE YOU IN THE NEXT VIDEO

CIAO CIAO!

NEW VIDEOS EVERY WEEK

For more infomation >> 🌈 UN COLOR ESPECIAL... 🌈 - Duration: 3:19.

-------------------------------------------

Você Apenas Tem que Conhecer Seu Lugar Verdadeiro - Duration: 28:02.

For more infomation >> Você Apenas Tem que Conhecer Seu Lugar Verdadeiro - Duration: 28:02.

-------------------------------------------

Nicola Panico dopo Temptation Island: la toccante dedica - Duration: 3:20.

For more infomation >> Nicola Panico dopo Temptation Island: la toccante dedica - Duration: 3:20.

-------------------------------------------

(Tsume003_00003) - Duration: 1:26.

Today is a mate in 3 moves!

Who wants to think without help, pause the video while you think.

After some hints and commentaries, there is the answer.

Use the power of Ogoma.

Playing 33KakuNari, 13Gyoku, 23Uma, DoGyoku, DoUma, DoRyu it is over with DoRyu,

but for 23KakuNari, he flee to 21Gyoku and as you can see, it is not over.

Even starting with 33Ryu, 21Gyoku as you can see, it is not over.

So, the 1st move is 31KakuNari.

He must to take it with DoKaku.

So, using the power of Ryu, finish it with 23Ryu.

So, the answer is: 31KakuNari, DoUma, 23Ryu.

Thanks for watching!

Any doubts or suggestions, contact us commenting this video.

I'm posting on Tuesdays Tsume Shogi for beginners, with mate on 3 or 5 moves, on Thursdays, mate on 7 or 9 moves,

on Fridays mate on 11 moves or more and on Saturday I'm posting Tsugi no Itte problems (Random Level).

See you next time!

For more infomation >> (Tsume003_00003) - Duration: 1:26.

-------------------------------------------

🎹Pianoforte Rilassante Per Calmare La Mente 🙏 Bellissima Musica Di Pianoforte Per Calmare L'Ansia - Duration: 1:10:48.

For more infomation >> 🎹Pianoforte Rilassante Per Calmare La Mente 🙏 Bellissima Musica Di Pianoforte Per Calmare L'Ansia - Duration: 1:10:48.

-------------------------------------------

[SUB ITA] GUMI - 99minutes theater - Duration: 3:44.

For more infomation >> [SUB ITA] GUMI - 99minutes theater - Duration: 3:44.

-------------------------------------------

ROCCA DI FICULLE PONTE 1 MAGGIO 2017 WWW SENTIEROELFI NET - Duration: 3:54.

For more infomation >> ROCCA DI FICULLE PONTE 1 MAGGIO 2017 WWW SENTIEROELFI NET - Duration: 3:54.

-------------------------------------------

천식은 왜 생기는 것일까? (한글자막) - 천식에 대한 모든 것 - Duration: 5:10.

For more infomation >> 천식은 왜 생기는 것일까? (한글자막) - 천식에 대한 모든 것 - Duration: 5:10.

-------------------------------------------

[RECORDTV] - Estreia de Larissa Alvarenga como apresentadora titular do Fala Brasil - 25/07/2017 - Duration: 1:31.

For more infomation >> [RECORDTV] - Estreia de Larissa Alvarenga como apresentadora titular do Fala Brasil - 25/07/2017 - Duration: 1:31.

-------------------------------------------

Silvia Provvedi commuove il web: la dedica per sua sorella Giulia - Duration: 2:58.

For more infomation >> Silvia Provvedi commuove il web: la dedica per sua sorella Giulia - Duration: 2:58.

-------------------------------------------

Volvo V40 1.6 D2 R-DESIGN VOL-R DESIGNLEDER PANODAK NAVI CAMERA 6VERSN LMV PDC - Duration: 1:01.

For more infomation >> Volvo V40 1.6 D2 R-DESIGN VOL-R DESIGNLEDER PANODAK NAVI CAMERA 6VERSN LMV PDC - Duration: 1:01.

-------------------------------------------

Volvo V40 1.6 D2 R-DESIGN VOL-R DESIGNLEDER PANODAK NAVI CAMERA 6VERSN LMV PDC - Duration: 0:59.

For more infomation >> Volvo V40 1.6 D2 R-DESIGN VOL-R DESIGNLEDER PANODAK NAVI CAMERA 6VERSN LMV PDC - Duration: 0:59.

-------------------------------------------

Renault Captur TCE 120pk Dynamique (CAMERA!!!/R-link/Climate/Cruise/PDC/17"LMV) - Duration: 1:00.

For more infomation >> Renault Captur TCE 120pk Dynamique (CAMERA!!!/R-link/Climate/Cruise/PDC/17"LMV) - Duration: 1:00.

-------------------------------------------

Renault Clio TCE 90pk Intens (Camera/R-LINK/Climate/Cruise/PDC/16''LMV) - Duration: 1:00.

For more infomation >> Renault Clio TCE 90pk Intens (Camera/R-LINK/Climate/Cruise/PDC/16''LMV) - Duration: 1:00.

-------------------------------------------

Renault Captur TCE 120pk Dynamique (R-link/Cliamte/Cruise/Trekhaak/PDC/17''LMV) - Duration: 0:58.

For more infomation >> Renault Captur TCE 120pk Dynamique (R-link/Cliamte/Cruise/Trekhaak/PDC/17''LMV) - Duration: 0:58.

-------------------------------------------

Atomic Blonde Movie Review - Duration: 8:15.

Mrs Wick! The Female Bond! Jane Bourne!

For more infomation >> Atomic Blonde Movie Review - Duration: 8:15.

-------------------------------------------

РАСТУЩИЙ РОБОТ [Новости науки и технологий] - Duration: 10:13.

For more infomation >> РАСТУЩИЙ РОБОТ [Новости науки и технологий] - Duration: 10:13.

-------------------------------------------

😍 SEXY GIRL TOP 10 MINECRAFT INTRO ANIMATIONS + Music Names by OliverFX - Duration: 10:03.

If You're reading this.... (•◡•)

then you're beautiful and loved

and deserve to be happy :3

I found myself a lot happier lately. thanks for all the supportive comments, it means a lot u guys understand. ❤

Stay tuned in, make sure to click the notification button, because 2017 is going to be a wild ride :') ❤

Guys be sure to share this video because I am currently trying to hit 20k subscribers

▪ Likes & Comments are always appreciated ♥

tell your friends

tell your family

let everyone know about me...

STAY AWESOME!

Thank you all for 18k Subscribers! <3

I hope you continue to support the channel. :D

Anyways, I want to remind you that you are a very special person.

There are many people who love you out there

and you are awesome

Never forget that you have a role in this world

that nobody else could fulfill.

You are unique, and you should be proud of that.

and have a wonderful day. ♥

Thanks to all that subscribe and help out! :3

Thank you all so much for supporting me this far.

I'd never thought that I would grow this fast.

Watching my channel grow faster than my inspirations

it amazes me how much I've gotten better.

I guess dreams really come true.

Join the #NotificationSquad by hitting that notification🔔 button next to Subscribe!

🔔Here's a new TOP Intro Makers. I hope you enjoy this top! :) Let me know which one is your favourite?

★ Let's be friends?😊

Like the video? ☺Share with your friends!❤

thanks for taking the time to watch the video.

If you have questions feel free to ask in the comments i will answer

Remember to share this video with your friends, and stay awesome. Love you all <3

For more infomation >> 😍 SEXY GIRL TOP 10 MINECRAFT INTRO ANIMATIONS + Music Names by OliverFX - Duration: 10:03.

-------------------------------------------

Why Hollywood Won't Cast Renee Zellweger Anymore - Duration: 3:57.

Once upon a time, Renee Zellweger was one of Hollywood's biggest stars.

She dazzled us in Chicago, put in two pitch-perfect performances as Bridget Jones, and scored

an Oscar for Cold Mountain.

But instead of continuing on to ever-greater success, she dropped almost completely off

the radar.

Here's a look at why Hollywood doesn't seem to be casting Renee Zellweger anymore.

She took a hiatus

Unlike many celebs who are forced into the background after work becomes scarce, Renee

Zellweger left Hollywood on purpose in 2010 — and stayed away for a solid six years.

She told People that she just needed to focus on herself for awhile.

"I took on a schedule that is not realistically sustainable and didn't allow for taking care

of myself.

Rather than stopping to recalibrate, I kept running until I was depleted and made bad

choices about how to conceal the exhaustion."

Although Zellweger has said that the break gave her some much-needed time to recharge,

it still cost her momentum in an industry with a notoriously short attention span and

an endless supply of thirsty talent.

Her producing career fizzled

In 2013, right in the middle of her break from acting, Renee Zellweger took a shot at

doing something different.

She co-created and produced a vintage-styled 1960s television drama called Cinnamon Girl,

which was loosely based on her own career journey from small-town Texas to big-time

Hollywood.

It's not clear whether she was looking to pivot into a new career as a producer or just

trying something new and different to pass the time, but either way, it didn't pan out.

Lifetime passed on the pilot, and Zellweger never got to test her mettle behind the scenes.

Her new look

In 2014, Zellweger made her first public appearance in ages at the Elle Magazine Women in Hollywood

Awards.

But the next day, all anyone could talk about was how different she looked, with rampant

speculation that she had gotten plastic surgery.

CBS even sent a reporter out onto the street to see if random people could recognize Zellweger

any more.

"Do you know who this celebrity is?"

"Quite honestly, I don't."

"I'm usually good at this, but no, I don't know…"

Zellweger responded with class, simply saying "Perhaps I look different.

Who doesn't as they get older?!"

Still, considering Hollywood has a history of shunning stars who have become less recognizable

to their fans, like Jennifer Grey, it's possible the new look may have hurt Zellweger's comeback

attempt.

Old-school star in an action world

Renee Zellweger is an classic movie star in the best sense of the term, bringing class

to musicals, dramas, and old school romances.

Unfortunately, Hollywood is making less and less of those kinds of movies every year,

as superhero films and action blockbusters with massive budgets tie up all of the studio

resources and eat up all the available theater screens across the country.

So far, her comeback has been limited to reprising her most famous role in the box office disappointment

Bridget Jones's Baby, and snagging in a role in the courtroom drama The Whole Truth, which

vanished from theaters almost instantly in 2016.

And then there's her upcoming film Same Kind of Different As Me, which has already generated

more than its fair share of controversy.

Just from the trailer alone, one reviewer at The Guardian wrote,

"I hate this film so much.

I want to set it on fire.

I want to kick it to splinters in front of its crying children.

I want to drown it in a bucket of horse diarrhoea.

This is the worst, most offensive thing I have ever seen."

Not exactly the kind of buzz you want to be getting when you're trying to restart your

career, but given Zellweger's limited choice of roles, she may not have many other options.

Tied up in court

For most of her time in the public eye, Renee Zellweger has done a bang-up job of keeping

the drama confined to her work.

But the one time the lines got blurred, the timing couldn't have been worse.

Coming straight off the release of Bridget Jones' Baby in 2016, Zellweger was unwillingly

roped into a contentious child support battle between her boyfriend, Doyle Bramhall, and

his ex-wife.

Despite asking the court to leave her out of it, she ended up having to testify, leading

to exactly the wrong kind of publicity just when she was looking for a world full of yes.

"With all this publicity, I got me a world full of yes!"

Turning it around

Despite a slow-ish start, don't write off Zellweger's comeback as a lost cause just

yet.

With a proven track record at the box office and the cred that only comes from being an

Oscar winner, she's likely to get another chance to show she's still got it.

Here's hoping Zellweger can find the right project to introduce herself to her fans again.

After all…

"... you had at me at 'hello.'"

Thanks for watching!

Click the Nicki Swift icon to subscribe to our YouTube channel.

Plus check out all this cool stuff we know you'll love, too!

For more infomation >> Why Hollywood Won't Cast Renee Zellweger Anymore - Duration: 3:57.

-------------------------------------------

Hyundai Genesis Coupe 2.0T 6mt 2.0i T !EXPORT PRIJS! - Duration: 0:59.

For more infomation >> Hyundai Genesis Coupe 2.0T 6mt 2.0i T !EXPORT PRIJS! - Duration: 0:59.

-------------------------------------------

Why didn't I use a mirror for the reflective surface for this product photography shoot? Karl Taylor - Duration: 5:38.

Hi guys I'm Karl Taylor... in this video, you're going to see this

photograph. You're going to see this picture and how I shot it - let

me just zoom in on it for you. There's a few details here to do with the

highlights on the bottle, the edge of the cap, the background glow, the

illumination on the label. Lots of things to talk about here you're going to see

exactly how I shot that in this video. Stay tuned to the end and I'm going to

give you a little bit of extra information about this particular

shot. So Urs, on this product shot, I'm just using a softbox, a 30/120 through

the side here. Diffusing it through a sheet of frosted perspex to

get this lovely line of light, this diffused light, down the side and neck of

the bottle. "If you take the diffuser away it's just too sharp or why do you use it?"

Well, yeah absolutely, the light from the softbox will be a very clean sharp edge line

and too defined in the bottle. I want a more feathered diffuse light

and then on my surface here I've just got a reflective surface to give a

mirror image of the bottle in the surface. "Is that just a mirror?"

No, it's it's actually a sheet of high

gloss metal, it's polished metal and it just gives a very clean reflection.

Sometimes with a mirror you get that double image reflection.

So, this gives you a single image and then on the front additionally I've got a light.

These Pico lights with the projection attachments on. That's just illuminating

our labels here and here - just basically concentrating that beam of

light and then that lovely glow of light that's coming through the back, giving us

the backlighting through the bottle. If we go around and take a look at that.

So I've just got a standard dish on the light and a honeycomb grid and

that's just putting that ball of light through the frosted perspex.

Focus adjustment: because

the Pulso light has the focus adjustment, I can adjust

the beam and the feather of the light a little bit. What I do is I experiment

with the feather of the light and also pushing the light backwards and forwards

to get the best result. "Focusing is a fine adjustment

of the grid and of the light beam?" Absolutely!

OK, let's try and get a couple of shots. So I'm just going to give you this piece

of silver card Urs. If you can just bounce a little bit of light onto

the neck of the bottle. Something like that.. yes that looks about right.

Yes, that's looking good.

"Spray the bottle before Karl?" Yes, it's a special mixture we give to

just give it this cold, condensation look.

"But the drops are solid?" Yes, it sets it rock hard so the droplets don't move and

then they don't evaporate - it's a special mixture that we create to put on

the bottles. "How do we create it?" Haha... well and that's the secret Ur!

You'll have to check out our pro level training (KarlTaylorEducation.com)

and find out our best secrets!

"OK"

Thanks for watching guys. I want to show you a couple more things on the photo to

make it totally clear with that tutorial what I was talking about. Let's just take

a look at the image again. So here is the bottle that I shot. Have a look

at this highlight on the bottle here, you see that lovely feathered highlight

that's going on there, that is because of the gradient lighting's caused by

the diffused perspex that I use. So rather than just using the softbox, I use a

sheet of perspex in front of it. Now that could have been diffusion material on

the roll but it's that diffusion material in that place that gives this

highlight. Let's take a look at that you can see that lovely feathered highlight

which means you don't get that clear stripy line. You can see it they're also

apparent on the side of the bottle there. The highlight on the top neck and cap of

the bottle there, that was purely from the mirror that my colleague always held

in position. The lighting you can see coming through the bottle is from

the light at the back which is also causing that lovely gradient/radial glow

in the background and then the lighting here on the label is caused by the small

projection attachment lights that I've got shining on to the front of the bottle.

So I hope you enjoyed that short tutorial thanks very much for watching.

For more infomation >> Why didn't I use a mirror for the reflective surface for this product photography shoot? Karl Taylor - Duration: 5:38.

-------------------------------------------

Avoid Fixed Head String Trimmers (PLUS: Ants in my Pants!) - Duration: 8:14.

I generally tend to dislike when people tell other people this is the way you have to run your business, or

this is the right choice, or this is the best equipment, or this is the way to do things because

with as many different personalities and

Sets of values and geographic locations and factors nobody can say that and know what they're talking about, right?

Nobody can say hands down. This is the right way to do things. I strongly believe that so in this video

What I'm doing, I'm not saying to stop using a fixed head

String trimmer what I am saying is in my personal opinion. This is one of the biggest reasons

Why you should consider

perhaps not using one, so

Here we've got a fixed head string trimmer. There's no bump stop

So this doesn't dispense string. You feed it through

these holes, so

I'm not sure if you're going to be able to see that

So there's two holes on either side you feed it through and then it's held in place by

You know just the nature of of not being able to slip out.

This piece of string, this is some of that black diamond that everybody got this is right around

20 inches of string and this this has a 17 inch swathe.

So 20 inches into a 17 inch swathe. How does that work? It's because of this curve here, so you've got

About three inches worth of string that is curved and you can see here's my cutter right here

this guy's going to be right on it and

this guy is going to be just a little bit short, so

This is about the most string that you can put in 20 inches

this

Is about the amount of string that

Once you get down to it, you said "okay,

I need to get a little bit bigger of a string in here because my swath is getting real small."

This is just about 15 inches and I'm going to show you what it looks like

So this is 15 inches worth of string and you can see

That meant not show up too bad, and you know some folks may say "Well,

that's ok, I can still cut with it", but I can guarantee it when it gets down to this for me

Like alright, this is taking way too long. It's just too short. I need to change it, so

In let's just you know let's just shave a couple inches off to say somebody might be able to use this more this is

This is right around 15 inches

This is right around 15 inches they got the measuring tape right here, so 15

Let's say somebody could go to 13 inches they could do another inch off of each swathe,

so and

Just for comparison. Here's the one that we had in it to begin with and it is

20 inches it's right at 20 inches

So you put in 20 inches and you have to change it when you get to 13 inches, so what is that? What's half of 13?

six and a half and

then that would be six and a half out of ten if you just divide them both by two

65 percent of your line is getting thrown in the trash you

Put in a 20, and you take it out at 13, and it's too short to use. So that's why, and again,

I'm not telling anyone to stop using a

fixed head, I've been using this for the past 4 months

I've been using it for the past 4 month and I

Thought starting out that it wouldn't be the best choice

But I wanted to see. I didn't want to take anybody else's word for it. You know I wanted to make sure for myself

That it wasn't the best choice

In my opinion there are several reasons to favor a self dispensing string trimmer head

Over a fixed, but this is the one that has the most fact behind it

It's not you know, "I feel like it takes longer "or "I think..."

This is a matter of fact that if you use a fixed head string trimmer, you're wasting

65% of the money that you spend on

String trimmer line, which may be insignificant. You know, I think I spent $35 on a roll. It will probably last me I

Don't know maybe...of course, I'm a lot smaller than some of you folks

so you guys might burn through string trimmer line a lot quicker

But this video is geared more towards folks who are just starting out anyway, so you're probably not going to be using a ton.

So like I said you spend 30 or 40 bucks on it

on a giant spool that's going to last you forever, it may not bug you that 65% of that is wasted,

But for me personally, the idea that I'm throwing away

65 percent of any amount that I spend on anything for my business

That that kind of bums me out

so that's why I'm going to start looking for a replacement head now that I've had time to analyze all these details and

That to me is the biggest reason why you should avoid using fixed string trimmer head

Just because it's so incredibly wasteful

And if you don't care about the environment at least think about, you know, throwing 65 percent of your money away

That's no good, so anyway,

I'm going to say it one more time. I'm not telling anybody to stop using string trimmer head

This is my personal number one reason why you should avoid using..people in general,

not you, people in general, should avoid using string trimmer head that is fixed when I sit down and look at the fact that I'm

Throwing away sixty-five percent of the string that I use

That's motivation to look for other options right anyway. Hope this video helped

three modes ago I get done with this yard, and I'm loading the

big dog up in the trailer my mower and

Right around my belt ow

So I look down. There's an ant underneath my shirt or like right at my belt line

So I crushed him and then there was another one. That was on my arm because I started looking around

Like oh man. I must have ran over an anthill. This is crazy anyways a stung like fire hurt hurt worse than the dickens

So you know I thought that was the end of it. I must have ran over an ATl

It's not going to happen again because it's gone. So then the next time I come back

Just out of curiosity. I look when I'm done and there's a two more ants crawling on me on my pant leg

So I got him before they bit me. I'm like they they're somewhere on the property that it's not you know

I thought I ran over an anthill and blew him on to me because I was like

Maybe there's an anthill here, and I was going like that, and it blew up and flew on me now. I realized that no

So then this time I start avoiding these things the the last mow

And I didn't get anything on me because I avoided these and then finally today. I was able to

Find them crawling around after I'd done a couple passes of the mower. I guess they get agitated

Look, there's two of them look at so when I was mowing

So when I was mowing I was just you know putting the mower through that and I was letting that brush up against me

There's ants all in that

need to add on A

Hazard pay fee is that a thing anyways. I thought you guys would get a kick out of that

For more infomation >> Avoid Fixed Head String Trimmers (PLUS: Ants in my Pants!) - Duration: 8:14.

-------------------------------------------

DIY Niffler Plushie - Fantastic Beasts and How to Make Them | @laurenfairwx - Duration: 14:06.

This tutorial video has been one of the most-requested crafts in the comments of my videos ever since

the first Fantastic Beasts movie came out. Today, I am so excited to show you how to

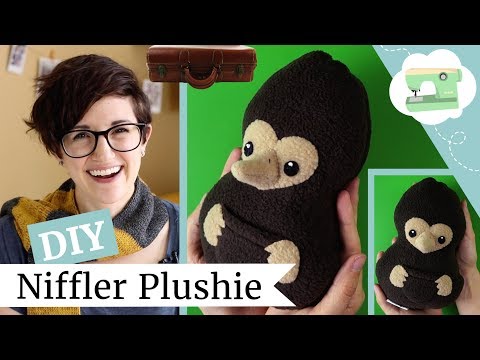
make your very own Niffler plushie, complete with a tiny pocket perfect for hiding shiny

things.

I thought the Niffler in Fantastic Beasts was adorable and hilarious and as soon as

I saw the movie, I knew that I had to go home and design a plush version of him in my style.

Give this video a thumbs up if you loved this mischievous little critter as much as I did!

I also designed a bowtruckle plushie so be sure to stick around to the end of the video

to see how that one turned out and learn how to make that as well!

And if you're new here, I'd love if you would subscribe so you can join my nerdy and

crafty little online family.

Check the video description below for a list of materials and a link to the free pattern

pdf, and here's how to make a super cute Niffler plushie with a teeny little pocket.

Start out by printing out the pattern pdf I linked to in the video description and cut

out all of the pieces. Then, take a small piece of beige fleece, place the heart shape

on the good side of the fabric, and cut around it.

Do the same for the paw shape! Then for the second paw, flip the template over and cut

it out that way so you'll get a mirror image. Next up is the nose! Give the fabric a tug

to find the direction that the fleece stretches - see how one way is much stretchier than

the other? Place the nose shape so the long nose is pointing the same way as the stretch,

because we want it to stretch out longer when we stuff it. AND we'll need two of this

shape, so fold the fabric in half with the good sides of the fleece facing out. That

stretch should still be there.

Pin the template to both layers of fabric, and carefully cut around the shape. This is

where some nice, sharp fabric shears will come in handy. When you're done, remove

the pin and you should have two nose pieces. Put the top one aside, then cut like this

across the larger round edge on the bottom piece. So the top still has the round edge

and the bottom of the nose will just have a normal, straight edge.

Cut out two little round eyes on black felt using the tiny circle template and once we

have all of those little details set, we can move on to making the body shape and the pocket.

You'll need some dark brown fleece! Place the pocket shape onto a small piece of it, leaving

a little space above the straight side, then cut it out with maybe an extra half an inch

or more above that straight edge, which we'll need for seam allowance, juuust like that.

Now, fold that straight edge back so we can hem it for a nice, finished open edge on the

pocket. Pin it in place, and be ready to sew one line across that edge through both layers.

Pop it into your sewing machine if you have one and remember to sew forwards and backwards

in the beginning and again at the end to keep it from unraveling. If you want, you can also

sew this by hand using a back stitch. I'm going to link to more detailed tutorials for

every stitch I use in this tutorial so read the video description if you need help.

Trim the extra threads and your pocket should look like this! Next, grab the main body shape

and note the direction of the arrows printed on the template. Here, I have a bigger piece

of the same dark brown fleece as the pocket, folded in half with the good side facing in,

so the wrong sides are facing out. Now, give the fabric a tug in each direction to see

which one is stretchier - you'll want to put the template so the arrows are pointing

in the stretchy direction.

Mark each side of a two inch spot at the bottom of the pattern so you'll know where to leave

a gap when sewing, then flip the template over and put it face down onto the fabric.

Trace around the pattern with a marker and make sure to mark where that gap will be;

it should look like this.

Cut loosely around the shape, I just do a rectangle giving myself plenty of space to

sew because fleece is a little tough to turn in a sewing machine. And now for a bit of

a tricky part - placing the pocket! Take your front piece, which is the one that has the

marker outline on it, separate it from the back piece, and flip it so the front side

is facing up.

Now, we're going to want this to be placed right in the middle of the body section of

the Niffler, but on the front side - so we won't really be able to see the outline

we drew for reference. To get the placement right anyway, I like to put the pocket where

I want it to go on the side with the outline, then poke a few sewing pins through the fabric

at the corners and along the bottom edge. That way, when you remove the pocket and flip

it over, you can place the pocket, right side up, inside those pins. Pin the pocket itself

to that front piece, remove the guide pins from before, and we're ready to sew it on,

close to the edge and all around the curved part of the shape - leaving the hemmed straight

edge open.

Start at one corner of the pocket, go forward a few stitches and then back a few to secure

it, then really carefully sew the curved edge of the pocket to the front fabric piece. Make

sure you don't get too close to the edge because you could end up with a hole and you'll

have to go back and stitch over it again. Once you've reached the other corner, stop

and go backwards again to lock those stitches in.

It should look something like this now! Trim off the excess threads and you can also trim

the edge of the pocket a little if the fold was awkward like mine was right here. And

yay! A cute, tiny pocket. Now, bring back the other piece of fabric you separated earlier,

make sure the good, fuzzy side is up, and flip the side with the pocket over, face down

onto that. The edges should match up because you cut them together before and the outline

should be right there on top.

I'm adding one of my logo tags to the seam here, but don't do this unless it's on

a plushie you've designed yourself. And now, just pin those two layers together inside

the outline but not too close to it. For the next step, we'll be sewing them together

starting at one end of the gap, going all around the body shape and the head, back down

the other side, and stopping at the other side of that gap. Don't sew through the

gap we marked; you'll need to leave that open.

Back on the sewing machine, I'm sewing right on that line we drew, stopping to turn the

piece at the corners. There's a spot at the top of the head where the hair is that's

a little tricky to see, but other than that, it's a pretty simple shape to sew around.

Stop when you reach the other end of the line, and there we go! It should look like this.

Trim the long threads and pull out the pins.

Next, trim around the seams, being careful not to cut into any of your stitches. To keep

the shape smooth when I turn it right side out, I also like to clip these little v-shapes

into the curves and corners. After that, open up the gap we left at the bottom and turn

the whole piece right side out! You can use a stick to push the seams and poke out any

corners or details.

Then, stuff the plush using small handfuls of fiberfill. I start by pushing the stuffing

into the far end and I keep going until the piece takes shape. When you're happy with

the way it's stuffed, press the gap shut and pin it like this. We're going to use

ladder stitch to sew it shut.

Thread a needle and tie a big knot at the end, then start by pushing the needle down

into the gap and up through the folded edge on one side where you want the stitching

to start. Flip the piece around, then push your needle down into the opposite folded

edge, straight across the gap before pushing it back up again on that same fold, just a

little bit over. When you give it a tug, that's your first stitch! Ladder stitch continues

by going back and forth across the gap and up the sides until you've closed the whole

thing, and again, if you need a more detailed tutorial for this stitch, I'll link to my

ladder stitch lesson in the video description below.

When you reach the end, tie a knot by grabbing one of the stitches at the end with your needle,

and hook the needle through the loop in the thread that forms so it'll make a knot.

Tie one more for good luck, then hide your excess thread by pushing the needle down into

the plush right where the knot is and push it out over here somewhere. That way, once

you tug on it and cut the extra thread, it'll get lost inside the plush. Now we're ready

to add all of the details!

Let's start with the nose. I've got the two pieces together with the right sides out

and I'm going to sew starting at one corner, around the long nose side, and stopping at

the other corner leaving this side open. Hold them together with a pin, thread a needle

with some matching thread, tie a knot at the end, and start between the two pieces of fabric,

pushing your needle down and out so the knot will stay hidden inside the nose.

For this part, I'll be using whipstitch and I've linked to a tutorial for that as

well if you need a refresher! Basically, you wrap the needle around the side and push it

down diagonally so it comes out next to your previous stitch. Keep repeating that motion,

wrapping around then push down diagonally, so you get these stitches that are parallel

to each other, attaching your two nose pieces together right at the edges. Don't tie off

the thread this time though because we'll need it later to attach it to the face! Just

kind of drop it for now.

It's starting to look more like the niffler's long, rounded nose! I decided to add two little

nostrils by stitching one short line on either side of the top half with some pearl cotton

thread. To tie that off, I kind of grabbed onto some of the thread on the inside and

tied a double knot on there before trimming the thread. Take a couple small whisps of

fiberfill and gently stuff the end of the nose, using a stick to push it in there.

So just for reference, the nose is going to be attached to the heart shape, which I use

for many of my plushie faces. Take those two black felt circles and decide where you want

the eyes to be placed in relation to the nose, which we'll be stitching on later. Then,

using a needle and some black thread, whipstitch each eye to the heart shaped face. For these,

start your needle going up from the back of the heart so the knots stay on that back side.

It looks similar to the whipstitch we did on the nose earlier, but the motion changes

a little when we're adding a flat appliqué like this. Once both of those eyes are secure,

flip the piece over and tie two knots onto one of the threads on the back and trim the

end.

To add highlights to the eyes, thread and knot some white embroidery floss and embroider

a french knot onto the upper inside corner of each eye. These are a little tricky and

can take some practice tries, but like before, I'm adding a more detailed tutorial for

that to the video description. Poke the needle up from the back where you want the knot to

go and pull it tight. Wrap the thread around the needle twice, close to the fabric, then

without unlooping the thread, push the needle back down pretty close to where it came up

and carefully pull it so the wrapped thread eventually makes a little knot right

up against the fabric. Repeat this on the other eye, then tie a knot on the back in

the same way we were doing earlier to secure it.

Now, gather all of the pieces because we're ready to attach them all together! Start by

pinning the paws to either side of the pocket and whipstitch each one in place. For this

one, start the knot under the paw so it gets hidden between the paw and the front of the

body shape and stitch all the way around.

To secure this kind of appliqué when you get back around to where you started, use

your needle to grab that first stitch, pull until you get a small loop in the thread,

and put the needle through that loop before you pull it tight - this will give you a small

knot along the edge and you can hide the excess thread by pushing it into the plushie and

snipping off the excess over here so it gets lost inside.

Then you can start on the other paw! When you're sewing on the claws, make sure that

you don't stitch the pocket shut if they overlap with the pocket like mine do. Just

make a shallower stitch and check occasionally to make sure the pocket still opens. Tie it

off at the end, and look how cute this is! The pocket takes a fair bit of work but I

think it gives it so much personality.

Next, put the face where you want it to go on the head and pin it into place. We'll

be whipstitching this on the exact same way as the paws, but there are less little details

and no pocket to worry about so it's quite a bit easier. Once that's all tied off,

we can add the nose! Push to make sure the stuffing stays inside, then place the open

edges flat against the face shape with the rounded part on top, closest to the eyes.

This one's kind of tough to pin down because it's already stuffed, but it'll make your

life a lot easier if it stays put while you're sewing.

Using the thread that's still attached to the corner of the nose piece from before,

carefully whipstitch up the top rounded half of the nose piece where it touches the face.

When you reach the opposite corner, stop for a second and take the opportunity to add a

little bit more stuffing if you need to. This is easier now that half of it is already attached.

Then, continue stitching along the remaining edge until the nose is totally attached to

the face. Tie one last double knot, hiding the excess inside the plush, and admire your

work because we are all done!

I am so excited to have this plushie designed and made and ready to share with all of you

because like I said earlier, it has been so highly requested and I've been wanting to

do it for a while. And now you can have your very own little niffler buddy to get into

trouble with!

I had so much fun making this little guy! It was kind of a challenge figuring out how

to do the pointy nose and the claws and I knew that he needed a pouch just like the

one in the movie, but I ended up being really happy with the finished product and I hope

you are too!

If you make one of my niffler plushies yourself, I would love so much if you'd post a picture

of it on Facebook, twitter, or instagram and tag me @laurenfairwx so I can see how it turned

out! And if you loved this tutorial, definitely share it with any wizarding world enthusiasts

you know.

Of course, there are so many magical creatures in the Fantastic Beasts series and I want

to make a bunch of them into plushies, so I also made a bowtruckle! This guy was probably

my favorite creature in the first movie so I couldn't resist designing my own version

of him.

To watch my bowtruckle plush tutorial next, click the link in the card above or in the video

description below! And if you have a request for what my next plushie should be, tell me

in the comments!

Thank you so much for watching and I'll see you soon!

For more infomation >> DIY Niffler Plushie - Fantastic Beasts and How to Make Them | @laurenfairwx - Duration: 14:06.

-------------------------------------------

Kanye West a-t-il couché avec un mannequin transgenre ? L'allusion qui sème le doute - Duration: 2:47.

For more infomation >> Kanye West a-t-il couché avec un mannequin transgenre ? L'allusion qui sème le doute - Duration: 2:47.

-------------------------------------------

Best Of Jason Mraz Live 2017 - Jason Mraz Greatest Hits Playlist Collection - Duration: 1:17:47.

Thanks for watching! Don't forget to SUBCRIBE, Like & Share my video if you enjoy it! Have a nice day!

For more infomation >> Best Of Jason Mraz Live 2017 - Jason Mraz Greatest Hits Playlist Collection - Duration: 1:17:47.

-------------------------------------------

Carmelo joing Oklahoma City Thunder NBA TRADE NEWS - Duration: 10:06.

what's going on everybody it's your boy Geoffrey with sports beat hitting you

with another heart track video about Carmelo Anthony and what's going on with

this trading situation just some up-to-date NBA news seems like in the

news we're going to be talking about the Oklahoma City Thunder are now seeking

out our mellow even though everybody else in the world knows he's going to go

to the Houston Rockets it would be pretty cool to see Carmelo join Ruffa

Westbrook and Paul George for the 2017 18 NBA season I think those threes would

be a handful for any team in the league including those superstar Timberwolves

but anyways that's what's in the news today that's what we're going to talk

about definitely have been trying to keep up the videos on where Carmelo was

he created and what's going on in league with all the situation around Kyrie

Irving kind of interesting because at first we were thinking man it would be

awesome if Carmelo was traded to play long Cleveland with Kyrie Irving in

LeBron James Kyrie comes out this week says hey I

don't want to play with LeBron I don't want to be in the shadow I want to go

play by myself which is really really entertaining because the fact of the

matter is poor Carmelo has been playing by himself

for the better part of the past three to four years I believe and so he's really

been sticking it out and out there on an island trying to survive in the NBA he

has come to prove that gives boring machine and can provide rebounding and

boring from anywhere on the floor and a general aspect to any team he plays for

now being upset or kind of loses to at this point in his career I completely

believe he has every right to be for the way that he's been treated in New York

they're not doing too much to help the team out as far as Luther making they

got rid of Phil bill came in he tried to force speed triangle triangle doesn't

work for everyone you know was definitely worked are the Wolves

back in the 90 but nevertheless Carmelo deserves to whine a little bit in my own

opinion the guy's grown man he's great basketball player hiring on the other

hand he's on the team with the best player that has ever picked up a leather

basketball my own opinion LeBron James hands down best player period ever and

so with that said Kyrie is complaining about being on the team with LeBron the

reality of that complaint is hiring faithful bronze going to lead so if in

that fact why would you want to be treated if LeBron can lead to team next

year why and you replayed by yourself and be the star on the team then why

would you want to get traded now that makes absolutely no sense to me

and I think he's just trying to get some attention from the league I'm not sure

what's going on with that don't like it very much I mean Harry if he isn't a

good bank and a bum player to watch he's not top 10 favorite of Milan but

nevertheless coming out being whiny like that is just by man I just don't

understand that anybody understands that drop that in the comment sections not

really don't get why he do we doing right now now LeBron did give off clues

that he believed in probably at a Lakers game scouting Alonzo ball watching long

ball ball plays probably hung out had steaks or whatnot but so it is I could

see where he gets the pressure haw man I'm going to get left a lot on the

Wolves if that's really what you want then all you got to do is sit there

another year and we'll be gone and most the people in back the wall ESPN

bleacher report most folks are saying you know he's looking out west and he's

probably going to make a move so I'm sitting waiting I think we're right on

it I think well bran is ghost come next season but that's not for this year so

how are we coming out fan I want to be on the team without LeBron is you're

kind of crazy so you still have to make it through a year demanding spray okay

well you can do that but what happens this is for example you get traded for

Carmelo Anthony with the New York Knicks and he comes over and plays on the

Cavaliers and you go get stucked in New York by yourself porzingis I'm sorry I

love you to you awesome big man but yeah so what if you

could go play in that situation I just don't understand it it would be great to

see off the riothamus Cavaliers but I don't think the Cavs are going to be

able to get Carmelo Anthony over to their team it would be amazing to me and

that would be a super PAC superstar team but as I was thinking about the video

earlier I was kind of thinking you know anywhere that Carmelo Anthony goes to

play ball he is going to be a one heck of a benefit because the guys did

straight for like I mention earlier he hustled free bound for machine condition

the ball I mean he's the complete package and he's refined his name while

he's been in reverse pocket self I mean that's just the craziness to how I think

about the crazies in the NBA and what's going on

it would tickle me to death to see Carmelo Anthony somehow find a way to

the Cavaliers Derrick Rose was created so I know they're already talking but I

don't know if anything decides a Kevin Love for Carmelo Anthony trades it would

work sending Carmelo down to Houston that have once again like I mentioned he

can go anywhere he's going to make somebody a contender because a lot of

teams have two or three pieces they don't have that fourth key for that

third keeping their really puts you in contention with somebody like Golden

State Warriors with the whole team acts more like but um yeah just looking at it

thinking he was lined up in Houston recently in the news they said what

about OKC what do you think about Carmelo being a thunder that sounds

pretty freakin awesome but it's right back to my main point which is whoever

gets in is going to be a contending team because they're adding a superstar most

teams already has one two sisters or Sarge I can't think of an NBA team who

doesn't have at least two and so by adding up Carmelo Anthony to your team

you are going to make yourself some sort of contender it would be really cool I

call Portland Damian Lillard and those guys were trying to get them to come up

there and play ball which man is like I see there's so many team

could use the Carmelo Anthony that would push them over the top and make them

into a contender champion 15 that I believe is why so many eyes are owned

Carmelo Anthony right now and have been since the first day of July ever since

the trades are first started coming up it's just amazing and then you've got

the gods like Kyrie who come out of nowhere with I want to be traded and a

response to a chess game with LeBron but normally you don't play games with

people on your own team especially if it's King James I mean now you're just

howling like a Butt head to the rest of the world or in my own opinion where

calories gotta wind up Jesus who knows I mean there's a lot of teams out there

that could use the super star point guard but I'm telling you his contract

so thick it will have to be sharper star and either one of these trades so what I

would like to see is Carmelo Anthony straight up for Kyrie and let's

Cavaliers figure out a point guard someone who could run the point that

would be an ideal trade traded over the plate third guy with the Oklahoma City

Thunder Paul George Russell Westbrook Carmelo Anthony that is a super squad

coming at you Steven Adams of course the and on blank on the other guy that just

signed his contract strictly defensive player lovely got a despot on blank at

the moment then you get them down to the Rockets with Harden and Chris Paul and

David comes it's a superb loan of theme so it's all interesting so much to do so

little con with the straight deadline rolling around NBA seasons in retrieving

those on it's only out a couple months to tip-off time again

so just excited to see where Carmelo's going to wind up where he's going to go

the new Kyrie news didn't I mean I think it's chalk to everybody but the reality

of it Kyrie if you want out of Cleveland why would you if your your excuses you

want out of you want out from under LeBron but if LeBron leaves next year

you my little stick Cleveland you have a tab leaders that'll be your old team

you've been kind of the Florida generalist at this point behind LeBron

so you know every now and then the student becomes the teacher and if

LeBron leaves you'll definitely play that a role so hopefully something

bigger comes up for Kyrie I think maybe he's going to be a bird how he should

disperse or even the Miami Heat would be a decent trade for him but what's up

with Carmelo I hope Carmelo goes where he can definitely make an impact that

being the Rockets the Thunder possibly over to Cleveland it's going to be a

super trade the next few days everybody's on it the agents are working

overtime ready to definitely go in the houston but in the back of my mind who

knows our procedure these things out something can definitely happen to

change that so this kind of waiting along to see what's going to happen to

pur futures Carmelo Anthony in the New York Knicks I wonder what the Knicks are

going to get Sir Anthony whichever direction they go as well should be a

lot I mean give it away at the scoring machine like that you better get

whatever your team's missing in New York and Lord knows we're missing a lot kind

of weird though having them in there the New York Knicks and caucuses

Cleveland recently box on and Derrick Rose let me think there may be more to

come from the Cleveland Cavaliers but we all get we get the ends and I'm going to

keep you up to date see anything new and pop it about Carmelo and Enza trade

definitely pop off a video about it to everybody people from watching the

videos we love you guys thank you guys for supporting us we're going to blow

this channel up and make it it something in the world of the usability so please

keep liking and commenting and entering loggia web season

For more infomation >> Carmelo joing Oklahoma City Thunder NBA TRADE NEWS - Duration: 10:06.

-------------------------------------------

10 Times The Justice System FAILED - Duration: 9:28.

Hey YouTube, Jim here!

Welcome to Top10Archive!

We trust in the justice system to keep us safe, but no system is completely fool proof.

Anything that relies heavily on a human element is bound to have its holes.

Whether it's a poorly handled crime scene or a complete disregard for the legal system,

some cases, like these following ten, show just how badly the justice system can fail.

Before we get started, help us out by hitting that like button, and be sure to leave us

a comment because we're always looking to engage in interesting conversations with you!

Also, don't forget to click the bell so you get notified every time we put out a new video!

10.

Gerard T. Schweiger It may not be a high-profile case, but the

murder of Tony Mozick Sr. in the small town of Leipsic, Delaware is a fine example of

the manipulation of the legal system.

During the trial against alleged murderer Gerard Schweiger, the defendant admitted to

killing Mozick, but his statement was refuted by his defense attorneys, who claimed he was

covering for his girlfriend, Mozick's daughter, Jennifer Barnes.

Despite a history of violence between Schweiger and the victim and his own admission, the

defendant was found not guilty.

After a short prison sentence for five lesser charges, Schweiger was recorded on a phone

call ultimately admitting to Mozick's murder.

9.

Lizzie Borden We all know the song, but do you know about

the trial of Lizzie Borden for the murder of her father, Andrew, and his wife, Abby?

By the close of the 19th century trial, Lizzie had been acquitted of all murder charges,

but the evidence seemed to pile against her.

During interviews, her story changed frequently and her alibi was proven illogical and unlikely.

The heir to Andrew's million-dollar estate had also been seen attempting to purchase

a highly poisonous liquid, prussic acid, and even admitted to burning a dress after the

crimes, one she claimed was stained with paint.

Where the case failed, however, was in the lack of forensic evidence as police never

fingerprinted the crime scene, as fingerprinting was still in its infancy at the time.

8.

Ronald Ebens On June 19th, 1982, Ronald Ebens and stepson

Michael Nitz murdered Vincent Chin after an altercation between Ebens and Chin at a gentleman's

club got out of hand.

With a Louisville Slugger in hand, Ebens and Nitz sought out Chin when he departed from

the fight, eventually finding him at a nearby McDonald's where they beat him into a coma.

Four days later, Chin died.

After the 30th anniversary of the attack, Ebens apologized for the murder in an interview,

though he didn't have to do it from prison.

Ebens and Nitz were tried in a county court, took a plea bargain for manslaughter, and

were slapped with three years probation and fines totaling just under $4,000.

7.

Robert Blake While waiting in a car alone after a meal

while husband and former Baretta star Robert Blake ran into a restaurant in Studio City,

Bonnie Lee Bakley was shot and killed.

A year later, Blake was arrested for the murder after two individuals, George McLarty and

Ronald Hambleton, claimed Blake solicited them to kill his wife.

Despite their testimony and other circumstantial evidence, the former actor was acquitted.

According to the defense's private investigator Scott Ross, he didn't believe Blake was the

killer, but was certain he was involved and the prosecution's downfall in the case was

not having Blake's former bodyguard, Earle Caldwell, testify against him.

6.

Natalee Holloway On May 30th, 2010, Jordan van der Sloot was

convicted for the murder of Flores Ramirez – but we're not here to discuss times

when justice was served.

Five years prior, American student Natalee Holloway vanished during a trip to Aruba,

her remains never found.

The only consistent suspect in her disappearance was van der Sloot who, after multiple arrests,

was cleared of all charges in 2007.

Though life wasn't perfect for the accused murderer, he could have been free from the

law if not for the murder of Ramirez.

In February of 2016, during an undercover recording van der Sloot was heard confessing

to the murder of Holloway.

5.

The Yale Murder Case "It came to me that I had to kill her and

then kill myself."

Theses were the words of then-23-year-old Richard Herrin, Yale student and murderer

of Bonnie Garland.

The crime was gruesome, a swift blow to the skull by a hammer split the victim's head

open.

After Garland spoke of breaking off her long-distance relationship with Herrin, he became obsessed.

After the murder, Herrin received an outpouring of support from the local Catholic community

who helped pay for Jack Litman, a top defense attorney with a glowing track record.

Litman's reputation did not disappoint as he was able to get the disturbed man off on

manslaughter despite Herrin's own admission.

By 1995, the killer was out on parole.

4.

Steve Avery Steve Avery was first arrested in 1985 for

the sexual assault of Penny Beerntsen.

Though his alibi was airtight and another inmate, Gregory Allen, had admitted to a similar

crime, Avery was sentenced to 32 years in prison and was released 18 years later only

after a DNA test exonerated him.

Two years after his release, Avery became the prime suspect in the murder of Teresa

Halbach and, in 2007, was sentenced to life.

Avery and his supporters continue to cry foul, claiming he was framed after it was revealed

a vial of his blood had been tampered with.

Many that believe he's guilty blame the local police and time spent in prison for

turning him into a potential murderer.

3.

O.J. Simpson Working against prosecutor Marcia Clark in

the trial of O.J. Simpson was more than just evidence.

Simpson's defense was a veritable "Dream Team" with Johnnie Cochran.

The trial, already marred by jury issues and crime scene handling, eventually shifted focus

from the murders of Nicole Brown Simpson and Ron Goldman to race relations between blacks

and the Los Angeles Police Department.

Simpson's defense used the momentum to use his race as an alibi, claiming the LAPD, specifically

Detective Mark Fuhrman, framed him.

The Hail Mary worked and Simpson was found not guilty.

In 2006, he released a book titled If I Did It and, in 2008, was convicted of armed robbery

and kidnapping in a Las Vegas incident.

2.

Kalief Browder Starting in May of 2010, 16-year-old Browder

endured what many would consider an egregious case of mishandling by the New York City Police

Department after being questioned for the theft of Roberto Bautista's backpack and

pricey contents.

Though Bautista's story changed multiple times, Browder was arrested and charged with

grand larceny, robbery, and assault.

Over the course of over 1,000 days in Rikers Island, Browder spent 800 of them in solitary

confinement and attempted to commit suicide on four occasions.

On May 29th, 2013, after 31 court appearances and no trial, Browder was released.

Though he tried to make a normal life for himself, Browder's mental state had changed

significantly, leading to his suicide in June of 2015.

1.

West Memphis 3 The convicted murderers of Steve Branch, Christopher

Byers, and Michael Moore, ended in failure for multiple different reasons.

Those in support of Damien Echols, Jason Baldwin, and Jessie Misskelley believed the evidence

that led to their convictions was not only circumstantial, but also tampered with.

The growing pressure from the public and media to finger a killer allegedly persuaded the

prosecution to create a case against the three.

The documentaries go on to show a "forced" confession from Jessie Misskelley - who has

a reported IQ of 72 - questionable testimonies from other inmates that were promised leniency,

and a complete disregard for all of the defendant's alibi's that were backed by reliable witnesses.

Others were more outraged by their release in 2011 - after they had spent over 18 years

in prison - convinced that the three had everything to do with it.

Either way you look at it, whether the West Memphis 3 were truly guilty, the killers of

Branch, Byers, and Moore are still free.

For more infomation >> 10 Times The Justice System FAILED - Duration: 9:28.

-------------------------------------------

Trump Delivers Wildly Inappropriate Speech To Children - Duration: 7:07.

On Monday, President Donald Trump spoke to the Boy Scouts of America's National Boy Scout

Jamboree, where thousands of young men in that audience along with their parents, got

to hear the president make claims like this.

Donald Trump: We put aside all of the policy fights in Washington D.C. you've been hearing

about with the fake news and all of that.

We're gonna put that aside.

Secretary Tom Price is also here today.

Dr. Price still lives the scout oath helping to keep millions of Americans strong and healthy

as our Secretary of Health and Human Services.

He's doing a great job and hopefully, he's going to get the votes tomorrow to start our

path toward killing this horrible thing known as Obamacare that's really hurting us.

By the way, you gonna get the votes?

He better get them.

He better get them.

Oh, he better ... Otherwise, I'll say, "Tom, you're fired."

I'll get somebody.

You know after seven years of saying repeal and replace Obamacare, we have a chance to

now do it.

They better do it.

Hopefully they'll do it.

Each of these leaders will telly you that their road to American sex and you have to

understand, their American success and they are a great, great story.

The fake media will say, "President Trump smoked," and you know what this is, "President

Trump spoke before a small crowd of Boy Scouts today."

That is some crowd.

Fake media.

Fake news.

By the way, just a question.

Did President Obama ever come to a jamboree?

Crowd: No.

Farron Cousins: Now, it's important to point out, once again, that the majority of people

in this audience were children.

They can't vote.

They will not be able to vote for many years.

Hopefully by the time most of them are eligible to vote, Donald Trump will no longer be the

President of the United States.

Furthermore, given their age and education levels, even if they get the best possible

education available to them, most of them have absolutely no idea what the president

is talking about.

Yet, still, for some reason, they decided to cheer him on.

Those chants of U.S.A., U.S.A. Cheering when he attacks President Obama and booing a past

president.

I mean if this reminds you of those Hitler youth rallies that we learned about, it's

because it's pretty much identical, I guess.

That's what Donald Trump was doing.

He was indoctrinating these young children with his backwards, biased, pro-rich, anti-working

class, poor policies.

And they ate it up.

You know why?

Because according to analysis of Donald Trump's speeches, he actually speaks at a fourth grade

level.

So, he was right on the level with these kids.

They understood every word, may not know the issues that he's talking about in-depth, but

then again, neither does Donald Trump himself.

But that's what so disgusting about this.

Furthermore, Donald Trump could not hold a coherent thought for more than a few seconds

before going into some other tirade about fake news or Obama or Hilary or whatever is

going on at the moment with him.

This was a disgusting speech.

It was disgusting to see these children react the way they did to this speech.

Tuesday morning after the speech, parents began to speak out, they were disgusted with

what Donald Trump did there and I'm sure a hell of a lot of parents had to bring their

kids home and explain to them that that is not the way that a normal grown up behaves.

In the past, presidents who addressed this jamboree spoke about things like leadership,

community service, commitment to country.

Republican or Democrat, they did not use the opportunity to bash the opposition or to indoctrinate

these children.

They tried to inspire them to just be decent human beings, but since Donald Trump himself

is not a decent human being, he didn't know how to do that.

So, again, he goes on this incoherent rambling spree where nothing makes sense, nothing ties

together, it's just a word salad that he's thrown together that really reminds you of

this particular incident.

Sarah Palin: Are you ready to make America great again?

You rock and rollers and holy rollers!

You know what, you guys haven't tried to do that every day since that night in '08.

When I was on stage, nominated for V.P. and I got to say, "Yeah.

I'll go.

Send me.

You betcha.

I'll serve."

And, like you all, I'm still standing.

No more pussyfooting around.

Can I get a hallelujah?

Crowd: Hallelujah!

Sarah Palin: He, better than anyone, isn't he known for being able to command fire?

Are you ready for a commander in chief?

How about the rest of us, right-winging, bitter clinging, proud-clingers of our guns, our

God, and our religions and our constitution.

Tell us that we're not red enough?

Yeah, coming from the establishment.

Right.

Farron Cousins: Donald Trump should never be allowed to speak to children.

He isn't good at it.

He doesn't know what he's talking about and he's confusing thousands of children in the

process.

He and Sarah Palin are exactly alike.

People like that, should not be allowed to address crowds in the United States for any

reason whatsoever.

All they do is lie and misdirect from things that are actually important.

For more infomation >> Trump Delivers Wildly Inappropriate Speech To Children - Duration: 7:07.

-------------------------------------------

SYFY LIVE FROM COMIC-CON | Stranger Things 'Upside Down' Parody Music Video | SYFY - Duration: 1:22.

For more infomation >> SYFY LIVE FROM COMIC-CON | Stranger Things 'Upside Down' Parody Music Video | SYFY - Duration: 1:22.

-------------------------------------------

DIY Bowtruckle Plushie - Fantastic Beasts and How to Make Them | @laurenfairwx - Duration: 11:26.

When the first Fantastic Beasts movie came out, I was completely smitten with Newt's

bowtruckle friend so toss me a thumbs up if you were too. My heart just went out to this

shy little leafy buddy who kept himself tucked inside Newt's jacket rather than being with

his own kind in a tree. I designed my own rounder plush version in my style and today,

I'm going to show you how I made it.

First of all, if you're new here, welcome! To keep up with me and see what I make next,

click the subscribe button below and hit the notification bell if you want to make

sure you don't miss anything. Especially if you're a Harry Potter fan, because Harry

Potter crafts are my favorite.

Take a peek into the video description below to see a list of everything you'll need

to make this guy including a free downloadable pattern! And stick around all the way to the

end because I also made a Niffler plushie which is pretty cute.

Here's how to make your very own bowtruckle plushie!

Once you've downloaded and printed out the free pattern pdf from the video description,

cut out all of the pieces. You don't have to keep the little legs together like this,

but I did. Those are all ready to go, so let's start out by cutting out the heart shape on

some light green fleece. I just hold the templates in place and cut around them. Next, cut out

two little circles for eyes on some black felt. Then, place the same circle template

onto the light green fleece and use that as a guide to cut a slightly larger circle. Then,

cut that circle in half to make two little eyelids!

To make the main plushie and the legs, take some green fleece and make sure it's folded

in half with the wrong sides out. Mark where you want to put a nice, big gap on the body

shape template - mine's on the side right here. Then, give your fleece a tug to see

which direction has more stretch. Make sure that the arrows on the pattern are pointing

in the same direction as that stretch, then flip the pattern over and place it down on

the fabric. I put the legs over next to it, then traced around each shape using a green

marker. Remember to leave that gap you marked open. Then, cut around the general shapes

leaving plenty of room to sew. I kept mine all on the same piece, but you don't have

to - we'll be sewing the legs first, just on the lines, leaving the top open.

I stuck a few pins on there to keep them from sliding around at the last second, and here

we go! If you're using a sewing machine, start and end your lines by going forwards

and backwards a few stitches to keep them from unraveling later. But if you'd rather

sew this by hand, that's okay too! I'll link to a tutorial for backstitch in the video

description below if you want to learn how.

There's one leg done. Do the other the same way, and once you've sewn around both, you

can cut that piece off. Cut pretty closely around each leg shape, being careful not to

clip the seam and leaving some extra fabric at the open end. Then, carefully turn each

one right side out. To do this, I use a tool called a pair of hemostats, also known as

surgical forceps, to grab the far end and pull it out. I'll link to where you can

get them in the video description below. Then, I push a stick in there to make sure the end

is turned completely.

Now that we have two finished legs, we have to attach them to the body. They're going

to go right here at the bottom with some overlap at the top so they'll get stuck in the seam,

but to get them there, they need to be upside down and inside the plush. So keep that placement

in mind, then lift up the top flap and stick the legs between the two pieces of fabric.

Make sure the open ends will get caught in the seam AND that there is room to sew on

the lines on either side without getting the sides of them caught. I pin them down to the

fabric so they won't move as much, then continue pinning on the inside of the whole

shape.

Then, we can sew it together! Start at one end of the gap we marked and sew right on

the line all the way around, stopping at the other end of the gap so that will be left

open. Remember to sew forwards and backwards a few stitches when you start and finish,

and be extra careful while sewing through the legs at the bottom - this is the trickiest

part for me because sometimes my sewing machine has trouble with all of the extra layers of

fleece.

Whenever you reach a corner, stop the machine and turn the piece before you continue. There

are lots of turns and small sections at the top where the leaves are, so take your time,

work your way around, and do a few backwards stitches at the very end.

Pull out the pins, then trim around the seams, being careful not to get too close to them.

Leave some extra fabric around the gap, and you can also clip little v-shapes into all

of the curves and corners so it'll keep its shape when you turn it right side out.

Which is the next step! I started by pulling out the bottom section with the legs, which

should be attached. Then, I used the hemostats to grab the end of each leaf and very carefully

pull it through to the outside. Once it's mostly flipped, you can push a stick into

the points to get the shape right and ahh yay, look how cute and floppy!

For some extra detail, I decided to sew a line through the center of each leaf! I think

it makes them look a lot more like leaves, just be super careful if you're using a

sewing machine to do it since those pieces are pretty small.

Trim off any extra threads once those are done! And now we can start stuffing. Push

small handfuls of fiberfill up into the head and continue to fill it up until you're

happy with the way it looks, then pinch the gap shut and pin it so we can stitch it closed.

For that part, we'll be using ladder stitch - and I'll link to a tutorial for that in

the video description in case you're unfamiliar with it.

Thread a needle with some green thread and tie a big knot onto the end of it. To start

it, reach the needle down into the gap and push it up and out through one side of the

gap like this, so when you tug it, the knot catches on the inside. Flip the whole piece

over, then draw a line straight across the gap. Push the needle down and over along that

fold, then back up just next to where the thread is going in. Then, go back across to

the other side of the gap and repeat that same motion. Up the side, across the gap,

up the other side, back across the gap, until you reach the other end.

To tie a knot and secure your stitches, grab one of the machine stitches at the end of

the gap with your needle, then put your needle through the loop that forms in your thread

so when you finish pulling, it ties a little knot. Make one more knot in the same place,

then to hide your excess thread, push the needle down into the plush right where your

knot is and push it back out a ways over. That way, when you tug on the thread and trim

it off, the rest of the thread gets lost inside the plush.

Now he needs a cute little face, so grab the remaining pieces. Decide where you want to

place the eyes on the heart-shaped face. Start by tying a knot at the end of a piece of black

thread and push your needle up from the back so the knot stays on the back side

where it'll be hidden. Then sew the eye pieces on by hand using whipstitch. Even

if you're new to sewing, don't worry - you can totally do this and I linked to my more

detailed tutorial for that stitch as well so you can learn it! Once both eyes are sewn

on, flip the piece over. To tie a knot, grab one of the stitches on the back with a needle,

then put your needle through the loop like we did before. One more for good luck, then

you can trim the excess thread.

To add highlights to the eyes, we'll use some white embroidery floss or pearl cotton

to embroider a french knot onto the upper inside corner of each eye. To do that, tie

a knot at the end and push the needle up from the back in the exact spot where you want

the first french knot to go. Place it down on the table to free up both of your hands.

Wrap the thread around the needle one time, pretty close to the fabric, then without letting

it unwrap, push the needle back down into the fabric, right next to where it's coming

out. That way, when you very slowly pull the thread through, it should form a tiny little

knot up against the felt eye. These can be pretty tricky at first, so feel free to practice

a few on a scrap piece of fabric. Repeat that process for the other eye, then flip the piece

over so you can tie a knot on the back just like we did before.

Now, we can add the eyelids! Thread some light green thread onto a needle and tie a knot

at the end of it. Then, pick up one of those tiny green semicircles we cut out earlier

and place it off the side of one eye like this - how you place it kind of determines

the emotion on his face, so do what you think looks best. Whipstitch it on along the outer

curved edge, leaving the side by the eye open, and that's what the first one looks like!

Place the other one on the opposite side to match and use that same thread to sew on that

one in the same way. Flip it over and tie it off the way we've been doing the others

by tying a knot to one of the stitches on the back and trim your thread.

He just needs a mouth! I'll be embroidering mine on using this thinner pearl cotton in

black with a knot tied at the end. I started by stitching one little line in the center,

then added more lines to one side of it until I liked the width. I curved it up at the end,

then I moved over to the other side and tried to copy that exactly over there. This is kind

of like a backstitch in a funky order, so you can check the list of sewing tutorials

for each stitch I used in the video description below if you want a slower-paced lesson on

that. You also don't have to make the mouth exactly the way I did - feel free to give

it its own little personality! Tie it off on the back the same way we did earlier.

Look how cute. I can't deal. We just have to sew the face to the rest of the plushie

and we'll be done! Pick a spot for the face and pin it in place, then get another length

of light green thread onto a needle with a knot at the end.

To start sewing the face on, push your needle up under the point at the bottom of the heart

so the knot will get stuck between the plush and the face piece. Then, you can start whipstitching

around the edge to attach the face to the head! Whipstitch is probably my favorite hand

sewn stitch - I use it the most often. You basically just keep swooping your needle down

off the side of the appliqué and do this diagonal motion so the needle comes back up

on the edge of the face piece in the next spot over. Of course, you could use all kinds

of different stitches if you like the look of something else or if you aren't as familiar

with this one! It's totally up to you.

When you reach the spot where you started, tie a little knot right onto the first stitch

we made by grabbing it with the needle, then pulling the needle through the loop in the

thread. Then push the needle down into the plush right where the knot is and

out over here to lose our thread on the inside like we did earlier! One last quick snip,

pull out the pins, and that is our finished bowtruckle plushie.

I am pretty obsessed with these. I think they're one of the cutest things I've ever managed

to make and I'm so happy to be able to share them with you! Also, like I said earlier,

they turn out really great if you vary the facial expressions with your embroidery - I

made this little smiley one too. And now he has a friend! I… might go make some more

now.

I'm not gonna lie. I made one of these for myself and he's sitting on my nightstand.

If you make your own bowtruckle plush, definitely post a photo of it on social media! I'd

also really love to see it, so don't forget to tag me - I'm @laurenfairwx on twitter,

facebook , and instagram.

Because I couldn't leave out the niffler, I made one of those too. And he has a little

pocket for hiding shiny things! To learn how to make this niffler plushie, click the card

above or check in the video description below for a link.

I had so much fun making these fantastic beasts and I hope you enjoyed learning how to make

them! If there are any more magical creatures you'd like to see me make into a plushie,

leave your requests in the comments below.

Thanks so much for watching and I'll see you soon!

For more infomation >> DIY Bowtruckle Plushie - Fantastic Beasts and How to Make Them | @laurenfairwx - Duration: 11:26.

-------------------------------------------

Urban Micro Home By Wind River Tiny Homes | Tiny House Design Ideas | Le Tuan Home Design - Duration: 6:08.

URBAN MICRO HOME BY WIND RIVER TINY HOMES

For more infomation >> Urban Micro Home By Wind River Tiny Homes | Tiny House Design Ideas | Le Tuan Home Design - Duration: 6:08.

-------------------------------------------

REPORT: Bill O'reilly & Sean Hannity Prepare Massive Announcement, Libs Panicking - Duration: 3:01.

For more infomation >> REPORT: Bill O'reilly & Sean Hannity Prepare Massive Announcement, Libs Panicking - Duration: 3:01.

-------------------------------------------

Atomic Blonde Movie Review - Duration: 8:15.

Mrs Wick! The Female Bond! Jane Bourne!

For more infomation >> Atomic Blonde Movie Review - Duration: 8:15.

-------------------------------------------

How To Install Genesis Reborn KODI Addon - Kodi 17.3 Krypton - Duration: 1:30.

In this video how to install Genesis reborn add-on in Kodi Krypton from the

main menu go to system file manager add source click in none and type the source

location enter a name for this media source hit OK and go back to main page

now enter on add-ons and click on the package installer icon install from zip

file enter on repo Jesus folder now install the repository Jesus box TV zip

file after the add-on successful install warning enter on install from repository

now in Jesus Box repository video add-ons enter in Genesis reborn and

click so install after install open Genesis reborn and enjoy this great

third-party add-on in your kodi media player thanks for watching and I hope

this video was useful to you if so hit the like button subscribe and I see you

in next kodi videos Cheers

For more infomation >> How To Install Genesis Reborn KODI Addon - Kodi 17.3 Krypton - Duration: 1:30.

-------------------------------------------

The Krabi Quick Guide | Halal Food & Ao Nang Preview | Travel Thailand | 4K - Duration: 5:10.

Today I want to talk to you about Krabi, not "crabby" —- a lot of people pronounce

it that way.

But it is a special city in the south of Thailand You can fly directly there from Bangkok and

you can have a really good time for pretty cheap.

First off you have Krabitown, it is a typical Thai town.

You have lots of great food there.

Some things you can experience.

That's where I went in town to have the delicious roti that you saw in the last video.

There's also a night market there.

It's not open for very long or for very late,

nor is it as impressive as some of the other markets around Thailand, but it is good

to check out while you're in town.

Most of the people coming to Krabi are going to spending a lot of time in a place

You'll sure hear about if you look Krabi up:

Ao Nang.

Ao Nang is the most developed beach in the area, and is probably the closest

comparison to Phuket.

So there' tons of guesthouses there.

You can find a place to stay fairly cheap.

There are nicer places too.

You can kind of camp out in Ao Nang and get your fill of Thai food.

There's a lot of Thai- Muslim halal food.

You'll see it's very popular with muslim tourists and people looking for

this kind of food coming up.

Malaysians —- as a lot of the food shares a common heritage and it's

pretty delicious.

So that means you're getting better fried chicken than you can get in other

parts of the country.

You're getting roti every corner that you can find in Krabi.

And you just have a lot of other really rich curries that are not as popular in other

places.

Such as your panang curry and your massaman.

So food lovers are going to like it.

If you are the type of person that is into outdoor adventure things, you're going

to love it.

Because Krabi is full of things that you can do.

Cliffs that make a beautiful back drop to some stunning beaches.

They'll take you out by long tail boat.

I think it only costs 100 baht, maybe 200 baht

round trip.

That's about $6 to get you out there from the Ao Nang pier.

It's quite a common trip, people are making it all the time.

Some people just go out for the day, while others go spend

a couple of nights on Railay.

You have a group of guesthouses there.

You also have a couple of small places you can stay for pretty cheap.

You can hit up Tonsai beach, a beautiful beach.

It's also popular for rock climbing.

You have a lot of natural places.

A lot of things that you can do.

You can go out snorkeling.

You have some caves where they'll take you and you

can see the bioluminescence which is where plankton in the ocean and when you swim

through they kind of glow a little bit.

It's pretty special I think, and of course, there's all of these islands in the area

Phi Phi Island, and even as far as Samui you can go from Krabi.

So it is a special place and I wanted to make a quick, short

video to tell you guys about it.

I'd say the things to be careful of are the

transportation.

The transportation can be expensive if you don't know how to

negotiate and you don't know what to look for.

You gotta kinda look for your red trucks and stick around locals to make sure you're

not getting charged too much.

There can also be a little bit of a hustle at the airport.

So be sure to look for that airport shuttle bus.

And finally, I'd say be careful in the evenings.

Krabi does have a bit of a nightlife scene.

People do want to kind of hang out, especially with a lot of young backpackers

and travelers there.

But just like with other Thai beach cities —- Koh Tao and other

places that you've seen incidents, I always try to tell people just as a precaution to

be careful.

There is like a seedy underbelly in Krabi.

So you do kind of have some purse snatching and gang related activity

happening in the evening.

It isn't something you should worry too much about, but

I always try to make sure people going there are aware of some of the safety issues.

That's it for this guide to Krabi.

Really quick, I just wanted to tell you about the food and all of the exciting

things happening there.

I hope that you have a chance to check it out

when you visit Thailand.

Thanks for watching and see you in the next episode.

For more infomation >> The Krabi Quick Guide | Halal Food & Ao Nang Preview | Travel Thailand | 4K - Duration: 5:10.

-------------------------------------------

BREAKING: Federal Judge Hands Trump Major Victory, Democrats Are Losing Their Minds - Duration: 2:31.

For more infomation >> BREAKING: Federal Judge Hands Trump Major Victory, Democrats Are Losing Their Minds - Duration: 2:31.

-------------------------------------------

Booker 'Astonishing' Kushner Didn't Recognize Russian Mischief MSNBC - Duration: 4:11.

For more infomation >> Booker 'Astonishing' Kushner Didn't Recognize Russian Mischief MSNBC - Duration: 4:11.

-------------------------------------------

This Simple Exercise Helps Remove Back And Belly Fat In No Time! - Duration: 4:02.

Visit Our Website Here : http://bit.ly/2q90Dxh

Most women tend to neglect the area between the chest and the armpits, which results in

a pesky bulge around the bra, tank top, or a bathing suit.

The good news is that the exercises below can go a long way in toning your back muscles

and preventing injuries at the same time.

This workout targets the following muscles:

Teres major: Helps rotate the upper arm in towards the body or bring the arm in when

they are out in a "T" shape Teres minor: It rotates the upper arm away

from the body and helps assist the Teres major in bringing the arm in towards the body

Latissimus dorsi: It is responsible for rotating, extending, and adducting the arms along wih

the Teres major and minor.

Workout to Blast Back Fat

These muscles are of utmost importance in terms of improving your posture.

Strengthening those helps keep you from slouching the shoulders forward, while allowing you

to stay straight and tall.

Best Back Fat Exercises To strengthen these muscles, add the following

exercises in your workout routine two or three times per weekly.

Do 15 reps of each and complete three to four sets per workout.

1.

Dumbbell Pullovers

Lie on a ball or on a bench, holding a heavier dumbbell.

Keep the head and shoulders ON the ball.

Lift the dumbbell up to the ceiling, holding it by the ends.

Extend the arms overhead and back behind you, engaging the abdominal muscles.

Don't arch the overhead or the back behind you.

Pull the weight back up by using the back of the shoulders.

2.

Resistance Band Pulls

Grip the tubing of a resistance band so that your arms are shoulder width apart.

Relax the shoulders down the back and bring the arms to their height.

Start by squeezing the shoulder blades as you pull the arms out to the side.

Bring the arms back to the original position.

3.

Dolphin Push-Ups

Begin in a plank position on the elbows, with the palms flat on the mat and the forearms

parallel to each other.

Keep the shoulders over the elbows and the abs tightened.

Engage the abdominals to lift the hips up and switch the shoulders back, and lower the

heels to the ground.

Shift the weight into the plank position using the shoulders and the abs.

4.

Rear Delt Flys

Begin by standing with the feet hip-distance apart and holding dumbbells with the palms

facing in towards each other.

Keep the bag straight and lower the upper part of the body so that it is parallel to

the ground.

Rotate the arms so that the palms are facing in, bend the elbows, and keep the arms rounded

while squeezing the shoulder blades together to lift the arms out to the sides.

Keep the shoulders and the neck relaxed while raising the arms.

5.

Wide Rows

Start from a bend-over position, keep the back straight, and bring the arms down with

the palms facing towards you this time.

Involve the upper back muscles and lead with the elbows as you pull the weight into a wide

row, with 90-degree bent elbows.

6.

Narrow Rows

This exercise is very similar to the wide row, so start in the same bend-over position

with the back straight.

Turn the palms on and complete a row, keeping the arms close in by the sides while bringing

the weights up by the shoulders.

Keep the neck relaxed and squeeze the shoulder blades together.

Lower down and relax, keeping the abs engaged and the back straight.

Additional Tips:

In addition to doing the exercises above, the things below are also an important contributing

fact to getting rid of the pesky muffin top:

Perform 60-minute cardio sessions 5 times a week

Practice yoga Eat smarter

Thank you For Visiting Our Youtube Chanel Please don't forget to subscribe our channel

Subscribe : http://bit.ly/2rRgSLG

No comments:

Post a Comment