Hello friends, welcome to your channel Arte In Your Hands, for today I will teach you
how to make this stork that serves as centerpiece to decorate rains of
baby, baby shower then come with me in all the step by step so that they learn
to do it together with me, remember Give us your love, share and
Subscribe if you have not already done so and also activates the bell so that you
come notifications of all our videos
then with this we begin
and these are the main materials that we are going to
use in this project I will give them the measurements is a circular base that
have 25 centimeters wide and the 2 centimeters of thickness
also the spheres the number 12, number 10 and number 8, one of each of them
these measures normally you have is for the width that the sphere would have
then 12 centimeters 10 and 8 and the sticks or also called
racks each of 28 centimeters and one of only 20 centimeters
and the pieces of Styrofoam, unicel, porexpán or technopor
depending on the country so they call, the other materials I'm going to
leave here in the description in the part low, I'll give you the whole list of
materials so that they have it for can they work, then with these
materials we started
Well, we start with the simplest thing that
then it is to cover the base we are going to cut a piece in foami (rubber eva)
that matches the circular base what what we do is put the base mark,
cut and we are ready then the piece in foami, after we paste it
with hot or liquid silicone then we are going to take a tape that we
like they can be the same color or different and cover the thickness part of
the circular piece, this is what I am going to do
and well then so I'm lined, the tape has the same width
of the piece of icopor is 2 centimeters then the tape is also 2 centimeters
So now we're covered, now what we're going to do is we're going to start working
with the spheres, with the first sphere that I'm going to work with is that of 8
centimeters or the number 8 that well they will also find her I will take
the scalpel, I take out the whole leaf and very carefully I will cut here
where you always see the union of the sphere around here I'm going to start
cut very carefully, the blade normally it has a lot to edge, then
I'm going to start cutting so that there are two pieces
already cut then the sphere by all the center, now what I'm going to do
is that with the spear point scalpel can make a hole but not in the
I'll do it a little more run considering that the size
that is to fit this frame this stick that has a centimeter of
thickness the sticks are 25 centimeters no of 28 as I indicated now
then of 25 x 1 centimeters I'm going to make the holes
here run not in the center but roughly leaving a
centimeter I'm going to make a few holes so that we fit and so they must then
stay here I did with the scalpel the holes and
here then I have them both fit, like this other
now I'm going to paint this in fuchsia and the sticks
in yellow
well here I already painted it in the part of
down is not necessary because he sticks on the base and also the racks or
I have painted the clubs in a strong yellow color and then what
I'm going to do is I'm going to apply silicone at the ends and I'm going to
introduce in those that are going to be the shoes
I introduce them and I paste them, but first what I'm going to do
the stork is that it will not keep the right legs but it will stay
with them as crooked, then I'm going to take sphere number 12 and I will take
the measure so that they also lace and I'm going to do the same
holes that I made here but in them taking into account that I stay more
well together the holes for the legs
and so then there are the holes where
the legs are introduced, the poles are used to
mark so to speak where they go to to be then used the scalpel tip of
He released all the Styrofoam, all over the porexpan that is in the center and
in the upper part that had not indicated I'm also going to make a hole
because it also goes a rack of 20 centimeters that will bind the body to the
head then here I have it too, this hole is not going to go in the center of
the sphere, this is the sphere and the center would be this one that is
here indicated by the same icopor then I will take a further distance or
less than about 2 centimeters 3 centimeters I'm going to make a hole
same size that fits me with the frame that will join body to the
head, the body decided that I'm going to paint the same color as the shoes,
it can be another color if you they want but it is for me to match
with the decoration, because what is the neck and head I will paint
of a lighter color of pale pink, I'll use that rose on my neck
and in what is the head, in the head I also made a hole in all the
center to make the union between the body and head then I will paint
these pieces and I show you how they are already you know this if it's a boy you can paint it from
light blue use a very nice blue and the head to if it would be painted in color
pale pink like the neck, I paint them and taught them how to look
now then with the pieces completely painted what we're going to start to paste
We are going to use liquid silicone, what I apply in the extreme
it is better in this case that liquid silicone allows us to organize the pieces
the hot one hits very fast and we can melt a little bit the styrofoam
well we organize the legs
well then the legs are left
and in the neck we will do the same so here I have the frame
I also apply liquid silicone
and the sphere that makes up the head I will also introduce
we let it dry completely as you can see here I will teach you more or
less how is it doing while I'm doing
another tilt in the camera, a better take then so we are staying
the right legs and head remain so inclined,
when he has already pasted well
the spheres with the racks, then let's start
decorate let's cut a piece in tull that has a distance of 8 centimeters
and that long has a meter, then 8 for a meter
and what we are going to do is start
to decorate the part that make up the body then here if we're going to
help with hot silicone that is not very very hot because that yes can
burn a bit the icopor and let's go then to paste it because we're going to do
as a kind of tutu in the body, let's start at the back
Look here is the head, this is the back like where the tail would be
I'm going to apply some silicone
and I put the piece of tull and start
to paste
so ended then the first round of the skirt of tull or tutu and I'm going to
Cut another piece with the same size It has 8 centimeters, 8 centimeters of
wide and long has a meter I'm going to do the same procedure and it's going to
put just a little higher, I'm going to stick it a little higher than this tull
and the same thing I do all around
well here then I finished to paste all the tull, now what I'm going to do is
that we're going to decorate the shoes, I'm going to lower the camera a little
focus on the shoes what we are going to do
so here what I did I cut some pieces in foami (rubber eva) and these have a
distance of 4 centimeters and width they have 3 or 4 millimeters, what I'm going to do
is decorating the shoes as if were some tennis
I apply silicone can be hot or liquid
and I start putting them in shoes
and the same thing I do with the other shoe
that's how the shoes are, in the tutu in this part if I want I can decorate
also to highlight the tutu then I'm going to put a braid of this
braid I will decorate here on the edge they can place lace also and some
applications if they want to do it to make it more beautiful more colorful
so then there are the shoes and now what I'm going to do is
that buy a cord as they can see looks like stuffed as in feathers
you can get it the same is a cord that feels soft as if it were
stuffed animal or feathers and this one we're going to decorate keeping in mind that the
stork as it is a bird then we want to put some applications
that is very nice, then here I go to cut
and he's going to paste it here in the outline of the shoes
so that the union of the spheres with the frame is not seen
I will do the same also in the top, (I'm going to climb very
slowly the camera, excuse me)
here where is the tutu as you can see then I also stuck with silicone
hot braid on the edge of the tutu and here in the outline so you do not see
Ugly the beginning of the skirt, then I'm also going to paste from this
ornament, then I'm going to show you how am I going to paste it
and how can you see then so we the shoes are left
already decorated the tutu, the stuffed piece on a feather ribbon
because these are like little feathers that part will be placed then that
makes it look very nice now we are going to start working on your head
well now I'm going to take a piece in foami be frosty or just yellow,
no matter what it is, this is a cut so to speak, a surplus that had this
has a measurement of 5 centimeters and the base of 2.5 cm then
what I'm going to do is that I'm going to join the piece
I'm going to join it to form the peak, I hold it well
and he's going to stay like this with this form so what I'm going to do is put it
where the peak of the Stork, here I apply enough silicone,
good enough that we do not go to get saturated, I apply
silicone, I stick it, I hold for a while when I dry
then we left and I got these eyes
you can get the ones that want there are many reasons in the market
I'm going to put these eyes on you and also placed them, these are screw type so I'm going to
locate them well, I will try to introduce them
now I insure them with silicone
I make sure with silicone and I will also use the same tape
of the same stuffed ribbon or feathers and what I'm going to paste here in the outline so that
I stayed much more decorated
and then, here, I already hit the ribbon pen
it is thus well decorated in this part of the legs,
on the top of the legs I also put the same pen ribbon
so now what I'm going to do is that with tape, this water tape I will take
28 centimeters I'm going to fold it and I'm going to knot here at the end with cord
silver as they see it here and in this part you can make a knot,
a bow and this I'm going to put on the end of the peak
I'm going to introduce it like that and here I'm going to paste it
that way and at the end here in the bag
I'm going to put an almond, you already decide if you want to put a
porcelain baby to decorate.
already the stork ready, I'm going to use the base that
principle I will cover and then I will apply enough silicone because I need the
body to stay firm, then I'll to apply
they already look hot silicone is used or liquid
and they put it in the center
and good friends then that's how it is
decoration as you can see I put some almonds at the base, you can
put chocolate or some cakes, what that you prefer to decorate
serves as a centerpiece as a candy so you can see it now I'm going to take
some pictures so that it is in a single plane and you can see how it looks then
the stork exhibited, I hope that like to put it into practice
remember that all these ideas we we share them with a lot of love for
you, today we want to greet many people from all over the world, countries that we
see for example in Canada, in Iraq, Pakistan, India, France, Germany, Italy,
The Netherlands, to all of them, thank you very much,
sharing in their same language they see us and appreciate our work, also to
all who speak our same language like in Spain here in Colombia,
Peru, Ecuador, Venezuela, Argentina, Chile, Uruguay, Costa Rica,
El Salvador, Panama, to all very many thanks for the support, today I want to say hello
to someone who is suddenly closer as it is to the ladies María Nancy Arias
to his son Jose, who are in the city of Cali, here a very special greeting
thank you very much for the support, then we hope you give us your "I like"
Share it and subscribe if you have not yet have made
see you in a next video here in your channel Art in Your Hands

 For more infomation >> Últimas notícia de hoje : Favreto, Gebran e Moro são intimados após decisões sobre soltura de Lula - Duration: 1:55.
 For more infomation >> Esferas de pedra gigante descobertas por cientistas em ilha remota do Ártico - Duration: 3:14.
  For more infomation >> BETA - Solanno / Kuririn / Matoco / Duzz / Drope / Errijorge (Prod. Rotta/Blakbone) - Duration: 5:57.
  For more infomation >> Von "Love Island" hinters Mikro: Andre Schimmels Song ist da - Duration: 0:52.
 For more infomation >> NOVA SÉRIE - THE FARMERS 1X01 │Mudança de Planos - Duration: 12:51.


 For more infomation >> Por qué murió UBUNTU TOUCH? - Duration: 8:35.


 For more infomation >> La figlia di Al Bano e Romina Power sarà in Don Matteo 11 - Duration: 3:21.
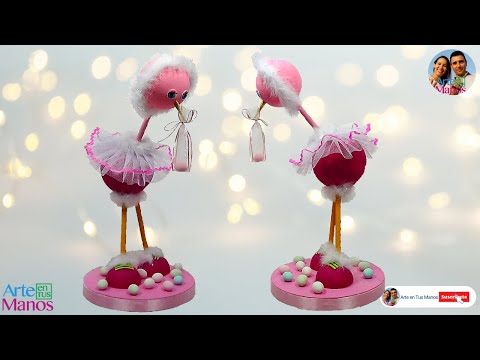


 For more infomation >> Tutorial de como zerar outlast pate 1 - Duration: 5:56.
 For more infomation >> Homenaje ASPIP al Tnte Gral PNP(r) Berli Baca Valdivia - 1/4 - Duration: 30:22.
  For more infomation >> 22/07/2018 10:08 (R. das Mercedárias, 19 - Dom Avelar, Salvador - BA, 41315-170,) - Duration: 1:37.
  For more infomation >> 22/07/2018 10:10 (R. dos Franciscanos, 54 - Dom Avelar, Salvador - BA,) - Duration: 1:05.


 For more infomation >> Renault Mégane 2.0-16V T RS Leer/Navi/Airco/Xenon - Duration: 0:54.
  For more infomation >> 50 Unexpected Moments! 😮 - Duration: 13:08.
  For more infomation >> Renault Mégane 2.0-16V T RS Leer/Navi/Airco/Xenon - Duration: 1:06.
  For more infomation >> A Feather「Celeste 🏔 Ep3」 - Duration: 59:42.

 For more infomation >> DIY Shoebox Toys - Burning Daylight - HGTV - Duration: 7:58.


No comments:
Post a Comment